Pages

Saturday, November 26, 2011

Brrrr....Frosty!

Hi all! Guess what? I can make normal sized cards, lol! Of course, I find myself making too few of these small A2 cards, but when I need a lot of them, quickly, these are the ones I end up making. They're so cute though, almost miniature compared to my favorite 6" square!


I used the adorable little snowman from PTI's Tremendous Treats set, I decided to stamp him in a light color for the 'no lines' effect. Quickly colored with some Copics, a couple of layered circles...

I ran across an awesome resource for sheet music you can print out, Free Scores.com. You can find tons of sheet music for any kind of song, which is cool because I wanted 'Jingle Bells', and print it out to use on your projects. And you don't have to feel guilty for cutting up the real thing. There are some really cool old, aged looking ones too for those vintage cards. 


The background paper was an experiment with the 'shadow stamping'. I've never tried it until now, but I love it. I'm pretty sure it's not called shadow stamping, but that's what it looks like to me and I can't remember the official name of the technique. I stamped all over the paper with dye ink slightly darker than the cardstock color, then went over it with white ink, slightly off center. That's what makes it look like a shadow, or embossing. Maybe it's called Faux Embossing?? I don't know...


Anyway, that's all for today, thanks for stopping by!


Stamps: Papertrey Ink
Ink: Adirondack, SU, Perfect Match
Paper: Hammermill, SU, Stardream
Tools & Accessories: SU Northern Frost Die, jingle bells, Baker's Twine, snow trim from Webster's Pages, Copics, Stickles, Nestabilities

Wednesday, November 23, 2011

Lili of the Valley Thursday Challenge - Anything Goes

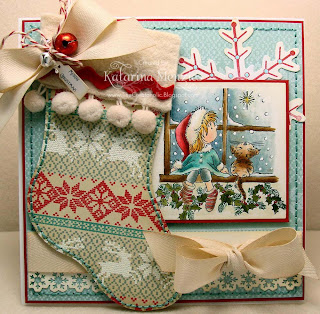
Hello everyone, we've got another challenge going on over at the LOTV blog, this week anything goes! I really took that challenge to heart and went all out with this big ole stocking ornament on my card. It can be removed and hung on the tree for the holidays. 


I added tea dyed pom pom trim, wool felt and a twill bow along with some hand stitching and jingly bells to the stocking die cut. There's a twine loop on top for hanging.


I colored Milly's Winter Window with Distress inks, and tucked the image in by the stocking. Such a pretty little picture, don't you think?
BTW, the colors I used to color and stamp the majority of this card are the new Winter Limited edition Distress inks, aren't they gorgeous!? Such a beautiful color combination. 


For those of us celebrating Thanksgiving, I hope your day is full of wonderful food, family and love! Let's not forget to count our blessings each and every day. I am so thankful for all my fellow stampers who regularly visit me here, I appreciate each and everyone of you!


Have a wonderful Thanksgiving Day!


Stamps: Lili of the Valley, Waltzingmouse, PTI snowflake
Ink: Memento, Distress, Versamark
Paper: PTI, water color paper, SU
Tools & Accessories: Lifestyle Crafts stocking die, PTI rick rack die, pom pom trim, wool felt, twill ribbon, jingle bells, embroidery thread, SU tiny tag punch, baker's twine, Souffle pen, Spica pen, Marvy Uchida Giga snowflake punch, jingle bells, Viva Decor Pearl pen, Martha Stewart snowflake edge punch

Tuesday, November 22, 2011

Old Thyme Christmas

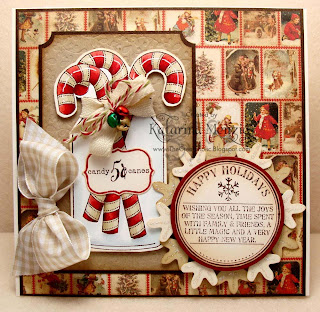
Hello everyone! I had a nice long weekend to get caught up on lots of stuff at home, managed to get some stamping/coloring time in too! I'm furiously trying to put a dent in the ole Christmas cards for family/friends pile. This is one of my favorite older PTI sets, Friendship Jar Holiday Fillers. I love all the little fillers you can use to put in the jar, candies, snowmen, snowflakes...


I used this gorgeous vintage collage patterned paper from Summertime Designs 'Old Fashioned Christmas'. I just love antique Christmas images, I wish I I had a collection of old postcards, calendars and greeting cards. The art was just incredible, and there's just something about the colors that were popular back then....


The candy cane jar was colored with Copics, added a little white highlight along the tops with a Sharpie Poster pen to make them look shiny. A twill bow, some tea dyed bakers twine and little colored jingle bells tied around them finishes it off nicely.


The sentiment seal is from Catslife Press, layered over some Giga snowflake punches. 


Thanks for visiting!


Stamps: PTI, Catslife Press
Ink: Adirondack, Distress
Paper: PTI, Stardream, Hammermill
Tools & Accessories: Nestabilities circles, Tonic ticket corner punch, Marvy/Uchida giga snowflake punch, Stickles, Copics, Sharpie Poster pen, gingham ribbon, PTI impression plate, twill ribbon, baker's twine, jingle bells


Sunday, November 20, 2011

Sharing Cookies

Good morning everyone, I'm thinking I might want to take up cross stitching or something, because I can't seem to stop doing it on my cards, lol! I love the way it looks and the texture it adds. It also just seemed the logical thing to do to this background paper I created with WMS's Nordic Winter. So pretty! It tool a loooong time to do the little cross stitching around the border, but man am I glad I did! 


This aqua, red and white color combo is rapidly becoming my favorite for Christmas/Winter cards. I used SU's Pool Party and Rindinghood Red here. It's so fresh and clean looking, very modern. The stamp is from Nellie Snellen, don't ask me where I got it, I had to get this darling from an Ebay seller in the UK. I didn't want to pay an arm and a leg for shipping two little stamps from a European shop, so Ebay saved the day. 


I'm  off to play with Nordic Winter some more, I have dozens of different sweater patterns dancing in my head! Thanks for visiting!


Stamps: Nellie Snellen, Waltzingmouse Stamps
Ink: Memento, Versamark, SU
Paper: PTI, SU, Hammermill
Tools & Accessories: Spellbinders Labels, SU Northern Frost snowflake die, jingle bells, Bakers twine, Stickles, Sizzix/Basic Grey embossing folder, Copic sketch/Spica markers, white trim from Webster's Pages, Souffle pen, embroidery thread, white embossing powder, McGill circle punch

Friday, November 18, 2011

Dashing through the snow....

 Good morning folks! It's Friday-ay-ay! (I've got the weekend off, so I'm excited, lol!) 
I've got another explosion box posted on the LOTV Inspire blog, take a peek if you've got a minute! 
I don't think I've ever made a clear card using acetate for the card base, but I've always admired them. I decided it was time to try.


It didn't come out quite perfect, clear cards require a lot more planning and forethought, which is really not the way I normally work, but for a first attempt it's OK. I used PTI's In the Meadow stamp set again.
I did not have a white permanent ink to use on the acetate, so I tried using an Adirondack paint dabber. It stamped really well, nice and opaque. I'm not sure how well it holds up though, I'll have to keep an eye on it to see if the paint scrapes off after drying for a while. 


I realized after I completed the card, of course, that there is no where to sign the card inside. The patterned paper 'hills' were supposed to be in the inside of the card, but I had already adhered the pine tree down and there was no way I would be able to remove it to put in the hills first. So I had to adhere them to the back of the card. Oh well, I'll know better next time!


Another episode in the adventures of paper crafting has come to an end for now...until next time!


Take care....


Stamps and dies from PTI, Verve & Basic Grey
Papers and ribbon from SU
Palette inks
Adirondack paint daubers
Glitter Ritz glitter and Sookwang double sided adhesive

Wednesday, November 16, 2011

Christmas Cottage Gift Box

Hello everyone! 
I don't know why I waited so long to make this Three Kings box from Waltzingmouse Stamps. I suppose it looked very complicated and I was a bit intimidated, so I kept putting it off. Well, to my surprise, it was actually pretty easy! (Pssst...it's a freebie in the WMS store- here.) Sooo, I'm looking through my fresh new stamps I got last week and 'A Cottage Christmas' jumps out at me, and I immediately thought of the 3 Kings box. A match made in heaven if you ask me...


So I print out the template on some Cascata shimmery ivory paper, make some score lines on my Scor Pal, pull out the old ruler and Xacto blade and in a few minutes, this gorgeous box emerges. This would be the perfect packaging for a small bottle of perfume, or some other little gift, I love it.


The cottages were stamped and embossed in gold, then I did a little light coloring with Copics. Two of the three sides of the box have the cottage, and the third has the 'Seasonal Remedies' label. 


I decorated the top of the box with a glass glittered snowflake and some twill ribbon. The bits of patterned papers I've decorated the box with are scraps from a Kaisercraft paper pad. 


Thanks for visiting, have a great day!


Sunday, November 13, 2011

Christmas waves a magic wand...

Good morning! There's not much stamping, and no coloring at all on this card today, just loads of beautiful die cuts and textured paper. This card started with me experimenting with the Damask letterpress plate from Sizzix. There a quite a few Damask embossing folders out there, but they were all too small for the size card I like to make, so when I saw the larger letterpress plate, I had to try it out with plain embossing. It did work with a few changes. I used thick water color paper, both the cutting plates, the MPP on the Big Kick (all tabs open) and around 3 folded sheets of newsprint between the water color paper and the cutting pad. The embossing was not as deep as an embossing folder, but still pretty good. After embossing, I spray Tattered Angels Glimmer Mist over it and let it dry. The cool thing was that the spray liked to run into the deeper, debossed sections and made them darker. Very pretty. After it dried, the debossing seemed somewhat lighter so I decided to run it through the machine again. This was easy to do because the design on the letterpress plate is very thick, so it slipped right into the previously embossed design and lined up perfectly. 


Running it through the machine again improved the debossed design dramatically and I had a gorgeous piece of almost velvet like textured paper. 


The pretty little sleigh die cut is from Marianne Designs Creatables. I cut two of them out of gold  Stardream cardstock and layered them with foam tape. I added some die cut greenery frosted with glass glitter in the sleigh. 


Thanks for looking, have a great day!


Stamps: Impression Obsession
Ink: Versafine, Distress
Paper: Strathmore water color paper, Kaisercraft, Stardream, Bazzill
Tools & Accessories: Spellbinders Labels/Oval Nestie, Marianne Designs Creatables sleigh/flourish die, Spellbinders Poinsettia dies, May Arts wide striped grosgrain ribbon, Viva Decor Pearl Pen, glass glitter, red pearls, Cheery Lynn Pine bough die, EK Success mini holly punch, Sizzix Ink-its letterpress plate, Glimmer Mist

Friday, November 11, 2011

Winter Wonderland

Good morning everyone, Happy Friday! It's also Veteran's Day, so let's not forget to thank a Vet for their service to our country. Thanks to all our military Veterans for fighting for our freedom!

I have another very time consuming card to share with you. These gorgeous backgrounds from Motivet are just so gorgeous, and they've recently released a few more. They're so beautiful. This one is the Christmas decorated house that I used with last year's Lili of the Valley stamp 'All Wrapped Up'. This elegant little lady is perfect with the grand Victorian house. 


I colored everything with my Copics, then added a bunch of 'snow' with my favorite paint spattering technique. 


I framed the background image with a Creatables die cut from gold cardstock. I added a little pine and rose spray on the bottom with tiny red jingle bells. I finally found the perfect pine branch dies from Cheery Lynn so it's easy to make these pretty little clusters.


With a card that took this much time to make, I couldn't neglect the inside of the card, so I added some pretty matching paper that I clear embossed with a pinecone cluster from Northwoods stamps. Hard to see in the picture... The die cut is from the Kaisercraft paper pad, 'December 25th'. 


Thanks for stopping by, have a great weekend!

Stamps: Motivet digital landscape stamp, Lili of the Valley
Ink: Memento, Distress, Versamark
Paper: Hammermill, Stardream, Kaisercraft, SU, Heavenly White
Tools & Accessories: Marianne Creatables die, Copics, wide striped grosgrain ribbon, seed beads, Nestabilities, Wild Orchid Crafts rose, Cheery Lynn pine branch die, jingle bells, Stickles, red pearls, sewing machine, American acrylic paint, old toothbrush

Wednesday, November 9, 2011

LOTV Thursday Challenge 'Creature Comforts'

Hello friends, are you gearing up to place your orders for the new stamps from LOTV? Which ones will you be ordering? It's a difficult decision I know!

For our Creature Comforts challenge this week, I went with this adorable critter 'April Showers'. Sometimes these easy-to-color images are great, they are super fast to do. And the matching sentiment is great, no more wasting time digging through my stash trying to find just the right one!

The little kitty is colored with Copics, and I went over the raindrops and the puddle with Crystal Lacquer to make it 'wet' looking. 


What to do you all think of the puffy little rain clouds? I wasn't too sure about these, but I spent so much time sewing them up I couldn't leave them off, lol! They're simply wool felt die cut clouds (die from Papertrey Ink) that I stitched together and stuffed. Then I added little rain drops with clear seed beads dangling from embroidery thread. Guess where that inspiration came from?! Mel Stampz of course....that woman is a genius!


Thanks for stopping by and don't forget to join in the challenge for a chance to win a prize.


Stamps: Lili of the Valley
Ink: Distress
Paper: Hammermill, Bazzill, Cosmo Cricket, Memory Box
Tools & Accessories: EK Success edge punch, wool felt, embroidery floss, PTI ribbon/button, Copics, Crystal Lacquer, seed beads, PTI banner/cloud dies

Tuesday, November 8, 2011

Special Delivery!

Good morning everyone! Here's a cute little new baby card I whipped up the other day, she's called 'Special Delivery'. She'll be available for purchase real soon. 


I used the gorgeous new Cheery Lynn lace edge die again, this time cut to fit around a circle. Actually, I cut all the individual lace sections apart and glued them in place around the edge. It's very delicate so I didn't want to bend it trying to force it around. You could never tell it wasn't meant to be a circle, can you?!


Super easy image to color with Copics, fast and simple. The sentiment actually comes with the image stamp, which is really nice. I love matching sentiments. 


Only two more days till you can order!


Thanks for visiting!


Stamps: Lili of the Valley
Paper: Hammermill, K & Co., Memory Box, Bazzill
Tools & Accessories: PTI ribbon, Cheery Lynn lace die, Copics, Crystal Lacquer, Nestabilities

Sunday, November 6, 2011

Tree tops glisten...

Hello folks, I've been without internet all day and was seriously going through withdrawal! It really stinks to have a day off and not be able to go online, lol! 
But, it's finally back and now I can post this card that has been sitting in my drafts folder for a while now. As some of you may know, I've been a huge Papertrey Ink fan almost for as long as they've been in business. My stamping style has evolved and changed a bit, and I don't use their stamps as much as I'd like to. I just love coloring too much, but every once in a while they put out a set that I absolutely adore. This 'In the Meadow' stamp set is one of them. There is nothing about this set that I don't love, it is just beautiful. The best part? It comes with a matching set of dies. 


So here's the first card I made using the set. I love silhouette stamps used with beautiful brayered backgrounds, so that's what I went with. I used some Post It note masks for some snowy drifts along the bottom, sponged along the edges with ink. It's amazing how simple it is to create snow with this technique. A lot easier than Copics or colored pencils, IMO!


To create the shadows underneath the deer and critters, I took a Tombow blender pen scribbled in some of the same ink I used to sponge the snow and just created some shadows underneath them. 
I added some die cut trees to the background using coordinating patterned papers, a vellum fancy tag with Nestabling rhinestones and I have another beautiful card added to my stash. I have to make sure and get these out on time this year!


Thanks for stopping by!


Stamps: Papertrey Ink
Ink: Versafine, SU, Distress, Perfect Match white ink
Paper: My Mind's Eye, silver shimmer cardstock, SU, vellum
Tools & Accessories: silver satin ribbon, Spellbinders Fancy Labels 2, Nestabling, brayer, Tombow blender pen, PTI tree die

Saturday, November 5, 2011

So Sweet

I've posted another card using one of the new stamps coming up on the 10th on the LOTV Inspire blog. Take a peek if you have a minute:


Wednesday, November 2, 2011

Warm 'n Cozy

Here's something totally different for me. I've seen a few cards with actual knitted items on them and LOVED them, I knew I'd have to try it sometime. I don't knit, but my mother does so I asked her to whip up a bunch of mini scarves for me. She was happy to oblige!

Since Papertrey Ink was featuring a challenge which was right up my alley, multi stamp background building, I figured I'd join in! I love using PTI background stamps, they make it easy to build gorgeous patterned papers. 


I used the Twinkle set as well as a snowflake from Peace Be Still in Scarlet Jewel, Ocean Tides and Antique Linen. I love rustic holiday colors.


I used my favorite Vineyard impression plate to create the Ocean Tides layer and made my own 'label-look' with a Martha Stewart edge punch and a corner rounder. The sentiment is from Snowfall.


Thanks for stopping by!


Tuesday, November 1, 2011

Mice are Nice Flower Shop

Hello loyal blog readers, thanks for stopping by today! Lili of the Valley has some adorable new stamps coming out if you haven't heard already. They're scheduled to be released Nov. 10 in their web store, earlier if you're lucky enough to be attending the Hobbycrafts show in Birmingham, UK! 
If you're a fan of their adorable Mice are Nice line of images, then you're in for a treat! Lots of new ones coming out soon. This one is called Flower Shop.


These cute little stamps make me feel so nostalgic. I've always been an avid reader since I was a small child and one of my favorite books was The Mouse and the Motorcycle by Beverly Cleary. I LOVED her books, and the mouse ones were read and re-read. I was fascinated by fantastical miniature worlds in which little creatures or fairies lived. Now that I think about it, I've always been entranced by miniatures. Maybe that's why I love making cards, you can use all sorts of miniature things to embellish them!


Anyway, this was colored with Copics, & added a bit of hand stitching around the edges. The card layout is based on the current Mojo Monday sketch. 


How about that gorgeous lace die cut??!! New one from Cheery Lynn, gosh it's gorgeous! I told myself I wouldn't need to buy as many dies once I became comfortable with my Gazelle, there are so many cut files out there, a lot of them free! BUT, I don't know if it's just me, or maybe my second hand machine has something wrong with it, but I just can't get intricate designs cut out nicely. I've almost given up on the thing, so the new dies keep on comin'!


Have a great day!


Stamps: Lili of the Valley
Paper: My Mind's Eye, PTI
Tools & Accessoris: Spellbinders Labels, Circle Scissor, embroidery floss, Copics, silk ribbon,  Daisy punches from The Punch Bunch, Cheery Lynn lace die, Viva Decor Pearl Pen