Pages

Monday, October 31, 2011

Halloween snowstorm

Good morning everyone! What an awful weekend off it turned out for me. Imagine my surprise when Saturday it starts snowing, and snowing....and snowing....
We ended up with this:


Trees came down on power lines, power went out mid afternoon, and that was the end of a productive crafting weekend. Yesterday we took a drive down to my parent's house in Jersey, my brothers were up from NC for the weekend, so we went for a visit. The power was out everywhere, from PA to NJ, we were lucky to find a gas station open to refuel!
Power was finally restored to us late last night, but there is no power in NJ where I was due for work this morning, so I stayed home.


That's the story morning glory, here's a card I finished up early this AM. 


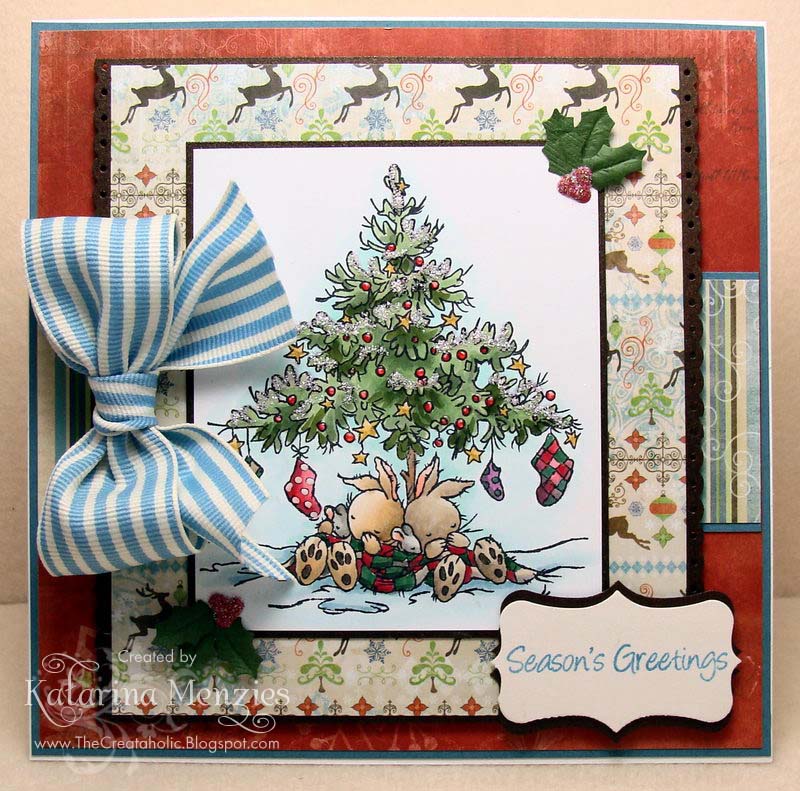
This stamp is from Sugar Nellie 'Knitted with Love'.


Fully decorated inside and out easel card. Fancy schmancy!


I made the little wool stocking with a Lifestyle Crafts (Quickutz) nesting stocking die. Sewed it together by hand with some aqua beads and embroidery floss. Added some greenery and a tiny wool felt rolled rose to the top.
The snowflakes are also cut from felt with a Stampin Up die (Northern Frost). I sewed some tiny seed beads to those too. Sometimes I just get in the mood for some decorative hand stitching/beadwork. It's very time consuming, so I don't do it often, but I LOVE the homespun charm it adds to cards. 


The papers are a digital collection from Raspberry Road Designs, 'Christmas Thyme'.


Thanks for peeking in, have a SPOOKY FUN HALLOWEEN!


Saturday, October 29, 2011


I have an easel card posted on the Ideas to Inspire blog, check it out if you haven't visited already!


Thursday, October 27, 2011

Lili of the Valley Thursday Sketch Challenge

Hello everyone! We have a lovely sketch from Bev for this week's challenge. I chose 'Lots of Letters' for my card. The image is so detailed and beautiful I didn't want to do too much in the way of embellishments. I chose to go with a variety of pretty papers and a big red striped bow. 


I colored my image with Copics once again, my poor pencils are feeling neglected, I'm sure. While I'm on the subject of Copics, I've had several requests for a list of colors I've used, but I just don't think I could be that organized. If you could see my work space while I'm coloring furiously, you'd understand why, lol. I have a 1/4 of an oblong kitchen table as my 'studio' and it is NOT pretty. While I'm coloring, there are tons of markers all over my table, some that I actually use to color the particular image I'm working on, some are just pulled out, tested and dropped on the pile because the color is not right. I get into such a 'zone' while coloring, that I'm quite sure I would never remember to write down the colors.


However I will share some tips I find very useful when choosing colors to use. #1- It is essential to have a hand colored chart of all your colors. Whether it's the official Copic one, or your own chart, this is an important tool. I keep my chart right next to me whenever I'm coloring, and refer to it often. 
#2- I choose which paper I am going to use before I start coloring. This makes choosing colors so much easier. The talented patterned paper designers have done all the hard work for you and chosen coordinating colors. Now all you have to do it pick out three or four of the dominant colors in your papers, and match them to your Copic color chart. For example, these papers had an orange y-red, a teal blue, a leaf green and a vanilla as the dominant colors. I looked at my chart and found the four markers that best matched these colors. 


I picked some lights and darks from the same color families, and with these colors I can color the majority of my image. For skin tones, I almost always use E0000, E00 and E11. I blush the cheeks with R01 and R02. For snow and white fur I usually use BG0000 or BG70, with a little BV00 for added shadows. Shoes are usually brown or black or shades of grey. That's all there is to it. I rarely keep track of color combos I use regularly except for the ones I've already mentioned for skin, snow and white fur. 
Finally, If I find the shading is not quite as deep as I'd like it, for the red hats and coats for example, I'll go back after I'm all done with Copics and darken the shading with colored pencil. In this case I used a Black Raspberry Prismacolor pencil.
So if you can match colors fairly well, choosing which colors to use for your image should not be too much trouble at all. Just make sure to practice, practice and practice some more! Every time you mess up, you will have learned from your mistake and the next time will be better, I promise you!


I hope these tips have been a bit helpful, it's the best I can offer.


Thanks for all your lovely comments, I so appreciate them, have a wonderful day!


Stamps: Lili of the Valley, Basic Grey 
Ink: Memento, Versafine, SU
Paper: Hammermill, Bo Bunny, Stardream
Tools & Accessories: EK Success tiny scallop edge punch, Nestabilities, SU ribbon, Copics, Stickles, Wild Orchid Crafts pearls

Tuesday, October 25, 2011

Peace, love & Joy

Good morning everyone! I ran into some more stamps made by this artist (anyone know who the artist is, let me know please!) this time from Nellie Snellen. I'm smitten with the adorable little girls and animals! I had to purchase these from an Ebay seller in the UK because I just couldn't find them here. 


Colored with Copics, added some snow with a Souffle pen, then sprinkled Glitter Ritz over it while it was still wet. It adds a soft delicate sparkle to the snowflakes. I framed the whole image with the Spellbinders Fleur de Lis square.


The sentiment is from an older Papertrey Ink Holiday Tags stamp set. I used SU markers to ink the leaves and the border a different color, then added tiny 'berry' pearls. Cute!
Papers are from Prima's North Country 6" paper pad. 


Thanks for stopping by, come back soon!


Stamps: Nellie Snellen, PTI sentiment
Ink: Memento
Paper: PTI, Prima, Heavenly White card base
Tools & Accessories: Spellbinders Fleur de Lis squares, PTI satin ribbon/button, Copics, Wild Orchid Crafts pearls

Sunday, October 23, 2011

We Love Snow!

Okay, I've had a long enough break from blogging. The past week has been a bit stressful and busy. For starters, my son got his Driver's License. Need I say more? lol. As excited as I was for him, the worry and stress from the worry really started building when my Dad announces he's going to buy him a nice used starter car. Well, I wasn't quite prepared for that, and I must say I've been going to bed much later than I'm used to. Waiting up till he was safely home, just like my mother used to do for me, lol. I used to think it was so silly to wait up for me, but what the heck did I know when I was a teen?! Now I know.

Ok, enough drama, here's something new I've tried. I've been long admiring these fancy-fold cards. I've done easel cards, and a couple of joy fold cards, but nothing too complicated. But, I really like this side step card I've been seeing people do. I got the directions from my most favorite stamping place in the world, Splitcoast Stampers of course. 


I wanted to create a snowy snowman scene for my first side step card, and went with these adorable snowmen from Sugar Nellie. They're colored with Copics, and cut out. I needed some pine trees for the background which I cut out on my Gazelle. I did a bit of sponging to give them some dimension and covered them in sparkly German glass glitter. I also added a few random glass glitters to the front panel for icy snowflakes.


The cute sentiment is from Papertrey ink, embossed in white. 


Thanks so much for stopping by!


Stamps: Sugar Nellie, PTI
Ink: Memento, Distress, Versamark
Paper: PTI, Gina K, Prima, Stardream, Basic Grey
Tools & Accessories: Copics, baker's twine, German glass glitter, white embossing powder, Gazelle, Martha Stewart snowflake border punch

Saturday, October 15, 2011

A Spooky Day

Good morning everyone! I have the weekend off and there's no kids and no significant other, so I am enjoyin' the peace and quiet! After work last night I settled down on the couch, and watched about 4 episodes of 'The Tudors' on Netflix, I can't tell you how long it's been since I've been able to do absolutely nothing
Well, I'm up bright and early (had to place my Papertrey Ink order nice and early before everything sold out, lol!) and I have another Halloween card to share. Now, to be perfectly honest, I don't really give out Halloween cards. Sometimes I sell them, or stash them in a box in case I might need it, or on the very rare occasion, give it along with a Halloween treat to someone special. I just love making them, I don't care about the 'What do I do with it?'. Cards are a miniature art form to me, the process is what makes me happy, it's my therapy!


So, how about some details... I found this gorgeous landscape background digital stamp from Motivet some time ago and just knew I had to color it. I don't do these types of cards very often, but sometimes I just have the urge to color up a whole scene. Problem was, after I colored the background, I couldn't find a cute little matching witch that was in the right proportion. I wasn't about to reprint and recolor the background so I set it aside. I find if I set something aside, eventually something will turn up that will work perfectly. Sure enough, this little cutie from SU's Greeting Card Kids was the answer.


I even made a matching postcard to go with the vintage card theme, it's kind of tucked in the back, a lot of it covered up. Oh well, the cool spider stamp is visible and that's the best part! This card was a lot of fun to make...


Thanks for peeking in on my blog, have a great weekend!


Stamps: SU, Motivet digital stamp, Catslife Press, Papertrey Ink
Ink: Memento, Distress, Adirondack, Versafine
Paper: PTI, Hammermill, Basic Grey
Tools & Accessories: Postage stamp die from PTI, striped grosgrain ribbon, Baker's twine, Copics, Spellbinders rectangle Fleur de Lis die, Stickles

Friday, October 14, 2011

Pretty Little Witch

Hello folks! I had such a hard time putting together this project, it sat on my desk for weeks. I didn't want a traditional Halloween theme, and I just couldn't figure out how to do it otherwise. Night after night I searched through my stash of patterned papers, but nothing appealed to me. Until I found this oldie but goody from Cosmo Cricket's Gretel collection. I love old CC, I wish they would do more of these old-time designs. Wonderland and Gretel are two of my all time CC faves. 


So once my paper was selected, the rest came together much more easily. I colored this digital stamp from Wee Stamps, 'Hazel' with Copics. She's so pretty! The fancy black frame was cut on my Gazelle from a Penny Duncan file.


I'm thinking about framing this instead of making it into a card, I haven't mounted it on anything yet. I'll have to stop at the craft store to see if anything catches my eye. This would look so good hanging on my wall, don't you think?


Thanks for stopping by!


Stamps: Wee Stamps, Catslife Press
Ink: Versafine, Distress
Paper: PTI, Cosmo Cricket, Hammermill
Tools & Accessories: Gazelle, Copics, McGill circle punch, gingham ribbon, EK Success bat chain punch, Prima Lace

Wednesday, October 12, 2011

Lili of the Valley Thursday Challenge 'Warm and Cozy'

Hello folks! It's time for our Thursday challenge again, our theme is all things warm and cozy. If you haven't read it already on the LOTV blog, the challenge DT has been split in two. Team A will participate in one week's challenge, Team B will do the next and so on. Makes things a lot easier I think.
Anyway, I dug through last year's Christmas release for this beauty, 'Mary and Joseph'. The little baby Jesus is all warm and cozy in his loving mother's arms.


I've been wanting to do an LOTV image on Kraft for a while, gives it a totally different look don't you think? The light brown gives the whole thing a very warm feel. I used a combination of Copics, then went back with my colored pencils to deepen the shadows. These two mediums work very well together, I've discovered. As long as you remember to color with Copics FIRST! If you do not, you will ruin your marker! 


Thanks for taking a peek, have a great day!
Stamps: Lili of the Valley
Ink: Memento, Versamark
Paper: PTI, My Mind's eye, SU
Tools & Accessories: silk ribbon, snowflake charm, Swarovski crystal, beads, Copics, colored pencils, Stickles, Spellbinders Labels, McGill circle punch, Vanilla embossing powder

Thursday, October 6, 2011

Postcard from Home

Hello everyone, I love Christmas scenes. I can't stop buying them even though I have tons. They just give me such a warm, cozy feeling. Here's my latest addition from Flourishes, 'Vintage Postcard'. 

I wanted to have a soft snowflake pattern in the background of the image, so I stamped it on some Basic Grey paper that had such a pattern already. I think it's from an old collection 'Wassail'. I then went back and colored it with Copics


The frame was stamped separately in gold EP, then cut out as a frame. I love this card, and I'm keeping it for someone special! 


Now here's my latest car 'dangle' creation for Halloween:


I used Topaz, Purple and a deep Mocha beads for this one instead of the traditional orange and black, and antiqued brass findings for a more vintage feel.
The pumpkin was cannibalized from a necklace I bought on Etsy last year. 


Thanks for dropping by!


Stamps: Flourishes
Ink: Memento, Distress, Versamark
Paper: Basic Grey, Stardream, SU, PTI
Tools & Accessories: PTI ribbon, gold Filigree embossing powder, Copics, Stickles, Cheery Lynn lamp die, Marianne Creatables flourish dies

Tuesday, October 4, 2011

Snow Fairy

Hello everyone, I am smitten with these winter fairies from Sugar Nellie. Look familiar? They MUST be the same artist that did these Pergamano stamps I've used in the past. Am I right or am I right?! lol!
Anyway, this one is called Hello Little Robin and she's a beauty. I colored her with my Copics. 


I finally got the coveted new Poinsettia from Spellbinders and now I am content that I have the perfect Poinsettia. I love that it embosses the veins in the bracts too. 


How about the little pom pom trim that look like snowballs? Sweet! I picked some up from an Etsy seller. I love Etsy, so many cool things there for great prices. I'll be updating my shop there with new cards very, very soon, so keep checking back! The link is in my sidebar.


Thanks for peeking in, have a great day!


Stamps: Sugar Nellie
Ink: Memento
Paper: Hammermill, PTI, My Mind's Eye, SU
Tools & Accessories: pom pom trim, Spellbinders Poinsettia die, Gazelle, satin ribbon, Viva Decor Pearl Pen, Stickles, Copics

Saturday, October 1, 2011

Celebrate WCMD with Lili of the Valley

Good morning folks, in honor of World Card Making Day Lili of the Valley is having a little celebration over at their blog. Some fun prizes are up for grabs so make sure you head on over  to join in on all the fun.
I can't seem to stop making Christmas cards! I think they may be my all time favorite kinds of cards to make, so I hope you're not getting sick of seeing them!
I used 'Christmas Bunnies- Tree' for my card today, this was from last year's Christmas release and I can't believe I've never inked this one up yet. 


The image was colored with Copics, added some Frosted Lace Stickles to create a snowy effect on some of the branches.


A nice big bow , some holly leaf punches and I call this done!


Thanks for stopping by!

Stamps: Lili of the Valley
Ink: Memento, SU
Paper: Bo Bunny, SU, Hammermill, Stardream
Tools & Accessories: SU ribbon, EK Success holly punch & tiny scallop edge punch, Stickles, Glamour Dust, Viva Decor Pen, Copics, Crystal Lacquer, McGIll label punch, Souffle pen