Pages

Showing posts with label Waltzingmouse. Show all posts

Friday, November 16, 2012

Holiday Sweet Shoppe

Happy Friday friends, the weekend is almost here! Of course, that doesn't mean much to me this week, I have to work tomorrow, poo! 
I made this very colorful card using Waltzingmouse Stamps Candy Jar Christmas set a little while ago. The papers are October Afternoon Holiday Style, I think.


After coloring the image with Copics, I applied a thick layer of Crystal Lacquer over the jar.


Can you believe Thanksgiving is next week?! I can't believe how fast the time is flying, it's scary.  I'll be mailing Christmas cards before I know it, eek!

That's all I've got for now, thanks for stopping by and have a great weekend!

Wednesday, October 31, 2012

Happy Halloween!

I made it by the skin of my teeth! We just got our power back on half an hour ago, and cable and internet soon followed, imagine that! We've been out of power since Monday afternoon, and even with a generator it was NOT fun. The poor kiddies all along the East coast have no Halloween to speak of. Fortunately, my kids are older and don't mind it too much. They've been out of school all week and they're happy about that. 
Fortunately, we escaped from any damage to our home, we're all safe and sound, although our neighbors were not so lucky. They weren't home when a tree fell onto their house, so we can all count our blessings. I'm sure there are thousands of other families who were not that fortunate and are struggling with being displaced from their homes, keeping warm and/or feeding their families. It was a terrible storm, very scary.


I just wanted to pop in and share a Halloween card I had ready a while back to share this morning. I actually have quite a few others, but wasn't able to take pics yet.


This card features stamps from Waltzingmouse, Authentique papers and Memory Box apothecary jar dies.

I hope you all have a safe and happy Halloween, thanks for stopping by!


Thursday, October 25, 2012

Sweet Gingers

I was so glad to see these little guys from the Gingerbread Joy stamp set show up on the Waltzingmouse blog recently as cut files. I love the look of cut out images, but usually am too lazy to handcut them. Claire was sweet enough to offer the cut files for free here. 


I stamped the Gingers in vanilla scented embossing powder, then added some shading around their edges with Distress inks. I tied their hands together with baker's twine.


The background paper is from Lili of the Valley's Christmas Kraft paper pad, they have the perfect Ginger cookie colors. A big red/white striped bow finishes it off nicely, don't you think? 

Hope you like them, thanks for visiting!

Monday, July 9, 2012

Welcome to the Neighborhood

Hello friends! I just got back last night from a long 10 hour drive to NC to pick up my kids from my parents house, where they spent the last week and a half. I am not a big fan of driving, long drives are my life every day when I commute to work, so it's the last thing I want to do! But, it's over with and I have today off to recuperate and maybe get crafty, so it's all good.

I was playing around with some older stamps a couple of weeks ago and came up with this card using Waltzingmouse's 'A Cottage Home' stamp set that I've never even inked up yet. Shame, shame! It's such a beautiful set of stamps, but I really wasn't in the mood to do a whole lot of coloring, so I ended up stamping the cottages on patterned papers. I did go back and add some shading with my Copics, but it didn't take long at all. 


I cut out the windows and attached some acetate behind them to make them look more realistic. I colored the acetate with some alcohol inks first to make them look like there were lights glowing behind the windows. 


Other than that, the rest of the card was made with Memory Box dies, the hillside in the background, the gate and fence, and of course the fancy tag on top from Spellbinders. I printed the sentiment myself from my computer.


It was fun doing something different, I think it shakes up the creative juices in me and prevents me from getting 'stagnant', so to speak. I always worry about that...


Anyway, thanks for stopping by and have a wonderful day!


Stamps: Waltzingmouse Stamps
Ink: Memento
Papers: My Minds Eye paper pad, PTI, Core'dinations
Tools & Accessories: Memory Box gate/fence/village dies, Spellbinders Fancy Labels, grosgrain ribbon, Copics, acetate, Adirondack alcohol inks

Monday, May 7, 2012

Krafty in color

Well it's back to work this morning, always much harder to do after a nice long vacation. I had this image colored and waiting for me on my desk from before we left, so I put it together today. Went with a lot of kraft cardstock, the image was stamped and colored with colored pencils on kraft, and also created a background pattern on kraft.


If any of you have tried to stamp on kraft cardstock with light colors, you know it's not the easiest thing to do. I haven't really found inks that show up well enough for my tastes, so I dug out my Adirondack paint dabbers. Those little sponge dabbers work really well for inking stamps, so I pulled out WMS's chevron background and stamped it in Cool Peri and Willow paint. That worked much better, as long as you clean the stamp immediately after stamping! I use an old toothbrush to really get into all the nooks and crannies so that NO paint remains. It will not come off later.


I then stamped a coordinating patterned paper with PTI's Beautiful Blooms II using colors from the same family of Adirondack inks. 


How about that pretty little vintage label sentiment, like it? I LOVE it! It's coming out this week with Lili of the Valley's new release. A whole pant load of sentiments for every occasion! I love the label shape so much, but LOTV, pleasepleaseplease give us a matching die?!! Maybe if enough of us bug them, they might consider it? (fingers crossed)
OR, if there is a digital cut file expert out there.... hint, hint....lol.


Well I'm off to work, time to see what a mess is waiting for me there...groan. Have a great day!


Stamps: Lili of the Valley 'Puppy Love' and Vintage Labels Occasions (May 9th)
Ink: Memento, Distress, Adirondack
Paper: PTI
Tools & Accessories: Flower dies from Papertrey Ink, wool felt (from stash), PTI button, satin ribbon, Spellbinders Fleur de Lis squares, Lyra colored pencils, OMS, Pan Pastels, Adirondack paint dabbers, Gelly Roll pen

Wednesday, December 28, 2011

Winter Birthday

Good morning everyone! I hope everyone had a wonderful Christmas. Mine was very nice, I had a few days off so I really got to enjoy it at home and we went to my parents to spend the day with my folks and brothers. I did get all my baking done, as well as those snowflake cookies I was talking about but I've got NO pictures to show for it! I made the mistake of making two batches of butter cookie dough, not knowing that one would be way more than enough and it ended up being a HUGE project! I spent the entire day making cookies, then rest of the evening decorating them so I was exhausted. I wanted nothing more to do with them when they were finished! I learned a few things from that day, and I can say I won't be making them again any time soon, lol! But I had plenty to give out to family and friends, and even brought some to work and they seemed to be a big hit. It was a good recipe.

Anyway, I want my routine back, enough hustle and bustle so here's a card I made recently. I'm still in winter mode, not ready for flowers and springtime yet, so I decided on a winter birthday card. This is a digital image from Wee Stamps.


With the popularity of Nordic patterns all over the place, I was really wishing for an embossing folder with a knitted pattern. Cuttlebug, Sizzix, anyone? Anyone? Nope, nowhere to be found unfortunately. So, I improvised and created a stamped pattern using the knit background pattern from Waltzingmouse Stamps. How awesome would that be as an embossing folder?! They have herringbone, argyle, hounds tooth, but no knit! Get with it!


Image was colored with Copics, and I added a little decorative hand stitching around it. The snowflake is an Amuse Studio die that I covered in clear EP to make it nice and shiny.


Thanks for stopping by!


Stamps: Wee Stamps, Waltzingmouse Stamps, PTI sentiment
Ink: Versamark, Memento
Paper: Hammermill, PTI
Tools & Accessories: twill ribbon, Amuse Studios snowflake die, embroidery thread, clear EP, Copics, Souffle pen, white EP, Stickles


Monday, December 12, 2011

'Cookies' and Nutcracker in Blue

Good morning all. It was a short weekend, but- I did manage to get some Christmas shopping done. Not much, a few small things for my other half. This is a record for me, I hate real-life shopping and will usually put it off till the last minute. It's online shopping all the way for me! I love coming home from work, stopping by our mailboxes and finding surprises there. It's like Christmas every time, lol!

Last week was kind of dry for me, not much going on in the creative department. I seemed to hit a wall and couldn't get much done. Everything was starting to get stale and nothing I usually do was inspiring me. I decided to try something different...


Somehow a Family Circle magazine ended up in my mailbox, I don't know if it was a freebie, wrong address or what, but I was flipping through it a couple of weeks ago and came across the recipe section. There were the most gorgeous snowflake cookies I had ever seen and I immediately went online to hunt down the fancy cookie cutters! I bought a bunch of them, snowflake junkie that I am, but this one particular set of 5 was amazing. There were three snowflake shapes in several sizes and two small triangular cutters for cutting out the insides in pretty patterns. (See them here.) I couldn't wait to make Christmas cookies, but it's still kind of early for parties and such, so I got to thinking...


What if I dig out all my old polymer clay gear and make some snowflake cookie ornaments to hold me over till I can make real cookies? Bingo! Out came the P.C. dedicated pasta machine, clay, and roller. I wanted to make them look like real sugar cookies, so I used a beige colored clay mixed with pearl white and translucent. In no time at all I rolled out some sheets of clay and started cutting. Popped them into the oven for half an hour and let them cool. I inked the edges of each ornament with Corduroy Distress ink to simulate the golden color they get from baking. Then I went to work with the Viva Decor Pearl Pen, lines, swirls, dots and glass glitter (looks like real sugar!), added some gold cord for hanging and voila! This project seemed to bash through the creative block! 

And finally yesterday, I was back to making cards. This gorgeous nutcracker from Waltzingmouse Stamps has been a long time coming. Doesn't he look proud!


He's gold embossed and Copic colored. Kept it simple with one color family. I decided to stick with the monochromatic color scheme for the papers too. Blue, white and gold. 


I made the plaid label layer using a plaid stamp from DRS Designs as well as one of the herringbone patterns from a WMS background set. I'm lovin' the plaid lately if you haven't noticed....


So, it's a pretty good start to the countdown till Christmas, no more dry spells please!!


Thanks for stopping by.


Stamps: WMS, DRS Desings
Ink: Versamark, Adirondack, Palette
Paper: PTI, pearl stripe from The Paper Temptress
Tools & Accessories: Spellbinders Nestabilities/Labels, Martha Stewart snowflake PATP, Filigree gold embossing powder, Stickles, Copics, PTI ribbon

Saturday, December 10, 2011

Cranberries and pine

Good morning everyone!
This is another fast, easy to crank out Christmas card, with no coloring involved. (Well, it's fast for me).


The background was created using Waltzingmouse Stamps' chevron from 'Offbeat Backgrounds' in Scarlet Jewel and Avocado. Such a pretty, yet different Christmas color combo.
I embossed a piece of gold mirror cardstock with a Sizzix folder, LOVE the way this looks, it's almost like a sheet of metal.


The wreath was stamped several times, to make it look more full of cranberries, and I embossed the top layer with clear. 
Sounds like a lot of steps, but it went pretty quickly.


How are you all doing with your Christmas cards this year? All done and mailed out?


Thanks for stopping by!


Wednesday, November 23, 2011

Lili of the Valley Thursday Challenge - Anything Goes

Hello everyone, we've got another challenge going on over at the LOTV blog, this week anything goes! I really took that challenge to heart and went all out with this big ole stocking ornament on my card. It can be removed and hung on the tree for the holidays. 


I added tea dyed pom pom trim, wool felt and a twill bow along with some hand stitching and jingly bells to the stocking die cut. There's a twine loop on top for hanging.


I colored Milly's Winter Window with Distress inks, and tucked the image in by the stocking. Such a pretty little picture, don't you think?
BTW, the colors I used to color and stamp the majority of this card are the new Winter Limited edition Distress inks, aren't they gorgeous!? Such a beautiful color combination. 


For those of us celebrating Thanksgiving, I hope your day is full of wonderful food, family and love! Let's not forget to count our blessings each and every day. I am so thankful for all my fellow stampers who regularly visit me here, I appreciate each and everyone of you!


Have a wonderful Thanksgiving Day!


Stamps: Lili of the Valley, Waltzingmouse, PTI snowflake
Ink: Memento, Distress, Versamark
Paper: PTI, water color paper, SU
Tools & Accessories: Lifestyle Crafts stocking die, PTI rick rack die, pom pom trim, wool felt, twill ribbon, jingle bells, embroidery thread, SU tiny tag punch, baker's twine, Souffle pen, Spica pen, Marvy Uchida Giga snowflake punch, jingle bells, Viva Decor Pearl pen, Martha Stewart snowflake edge punch

Sunday, November 20, 2011

Sharing Cookies

Good morning everyone, I'm thinking I might want to take up cross stitching or something, because I can't seem to stop doing it on my cards, lol! I love the way it looks and the texture it adds. It also just seemed the logical thing to do to this background paper I created with WMS's Nordic Winter. So pretty! It tool a loooong time to do the little cross stitching around the border, but man am I glad I did! 


This aqua, red and white color combo is rapidly becoming my favorite for Christmas/Winter cards. I used SU's Pool Party and Rindinghood Red here. It's so fresh and clean looking, very modern. The stamp is from Nellie Snellen, don't ask me where I got it, I had to get this darling from an Ebay seller in the UK. I didn't want to pay an arm and a leg for shipping two little stamps from a European shop, so Ebay saved the day. 


I'm  off to play with Nordic Winter some more, I have dozens of different sweater patterns dancing in my head! Thanks for visiting!


Stamps: Nellie Snellen, Waltzingmouse Stamps
Ink: Memento, Versamark, SU
Paper: PTI, SU, Hammermill
Tools & Accessories: Spellbinders Labels, SU Northern Frost snowflake die, jingle bells, Bakers twine, Stickles, Sizzix/Basic Grey embossing folder, Copic sketch/Spica markers, white trim from Webster's Pages, Souffle pen, embroidery thread, white embossing powder, McGill circle punch

Wednesday, November 16, 2011

Christmas Cottage Gift Box

Hello everyone! 
I don't know why I waited so long to make this Three Kings box from Waltzingmouse Stamps. I suppose it looked very complicated and I was a bit intimidated, so I kept putting it off. Well, to my surprise, it was actually pretty easy! (Pssst...it's a freebie in the WMS store- here.) Sooo, I'm looking through my fresh new stamps I got last week and 'A Cottage Christmas' jumps out at me, and I immediately thought of the 3 Kings box. A match made in heaven if you ask me...


So I print out the template on some Cascata shimmery ivory paper, make some score lines on my Scor Pal, pull out the old ruler and Xacto blade and in a few minutes, this gorgeous box emerges. This would be the perfect packaging for a small bottle of perfume, or some other little gift, I love it.


The cottages were stamped and embossed in gold, then I did a little light coloring with Copics. Two of the three sides of the box have the cottage, and the third has the 'Seasonal Remedies' label. 


I decorated the top of the box with a glass glittered snowflake and some twill ribbon. The bits of patterned papers I've decorated the box with are scraps from a Kaisercraft paper pad. 


Thanks for visiting, have a great day!


Friday, September 30, 2011

Spooky Treat Jar

Good morning everyone! Can you believe September is just about over already?! Where does the time go? 
I've been wanting to make a jar filled with Halloween treats for a while now, especially with the Ghost shaped Peeps peeking through the side. So cute! I decided NOT to make it the recipe mix, since I read the comments that the bars didn't come out so well, so I just made it a treat jar. 


Stamps are all from Waltzingmouse. I colored the Gracie tag from 'Gracie at Halloween' with Copics.

 I covered the lid of the jar with SU's waffle paper, curled up the edges and added some Cosmo Cricket patterned paper circles. 


The jar needed a 'knob' to lift the lid so I fashioned one from a glass bead and some Vintaj bead caps. 
I adhered a label stamped with the sentiment from 'Cicely at Halloween' and from 'Very Vintage Labels No. 5' to the front of the jar with some super sticky double sided tape. 


How cool would this be to give your older kids?! They come together very simply and look so much cooler than a plastic baggie, LOL. I know my daughter, who is 14, has dibs on this one.


Thanks for peeking in on my blog, see you again soon!


Wednesday, September 28, 2011

Warmest of wishes...

Good morning folks, I'm putting a pretty good dent in the Christmas card pile, and it's still nice and early so I should be good in time for Christmas. How's it going for you?
This is a very traditional style card, which I love, using a variety of stamps. 


The Poinsettia is from Papertrey Ink, embossed in pearl white and water colored with Peerless w/c's. I did three separate layers and cut them out for more dimension. 
The sentiment is from Lili of the Valley's clear sentiment set and the gorgeous frame embossed in gold around the label die cut is from Waltzingmouse Stamps. 


The papers were printed from a digital kit from Raspberry Road Designs, 'Christmas Remembered'. 


Thanks for stopping by!


Friday, September 9, 2011

Jolly Japes!

Good morning blog friends! Here's another spooky Halloween card for you using the wonderful Waltzingmouse Stamp set 'Cicely at Halloween'. When I saw the sentiment 'Jolly Japes' I laughed out loud. It sounds so innocent! I have never heard this phrase before, but I could pretty much guess at it's meaning. I looked it up anyway:
jape  (jp)
v. japed, jap·ing, japes
v.intr.
To joke or quip.
v.tr.
To make sport of.
n.
A joke or quip.

[Middle English japen, probably from Old French japer, to yap, chatter, nag, of imitative origin.]

Perfect for a vintage looking Halloween card. LOVE it!


I printed out this digital background paper from the 'Hallow's Eve' collection from Raspberry Road Designs. Then I went to work hunting down some spooky cut files for my Gazelle. The row of grave stones is actually a font, a set of Halloween dingbats. 
I colored Cicely with my colored pencils and cut her out completely. I wanted her to be a part of the whole scene, sneaking through the cemetery on All Hallow's Eve, lol! 


I dyed some seam binding with homemade spray mists from Adirondack reinkers. I never have the color ribbon I need for a project when I need it, which is funny because I have tons of ribbon, lol. 
Gotta run.
Thanks for visiting!


Thursday, September 1, 2011

Vintage Witch-y

Good morning all! We finally got our power and internet back yesterday, happyhappyjoyjoy! I don't like being without internet, it makes me feel lost. 

I have a lot of card blogging to catch up on, so let's get to the good stuff. 

Halloween is one of my favorite times of the year. Probably because I love all things creepy and spooky. I chose to make a card using a Waltzingmouse Stamps image from  'Cicely at Halloween'. I love this set of stamps, so classic, so vintage, so adorable!


I colored the image with my Copics and matted it on several different colored layers of scalloped circles. 


Then I created a 'ruffle' to go around the lacy circle using crepe paper I dyed with some Glimmer Mist. A pretty striped twill bow too...


I decorated the inside of the card using the same papers and the sentiment from the stamp set. LOVE the fonts used in this sentiment. 


Pretty creepy, huh?


Thanks for visiting!


Stamps: Waltzingmouse Stamps - Cicily at Halloween
Ink: Memento, Perfect Match, Distress
Paper: PTI, Hammermill, Scrap Girls 'Spellbound' digital kit
Tools & Accessories: Spellbinders Nestabilities/Fleur de lis squares, EK Success bat punch, crepe paper, Glimmer Mist, Copics, twill ribbon

Sunday, August 14, 2011

Witches flying by...

Hello folks! Finally a day off from work, and there is so much to cram into just one day, I feel seriously overwhelmed. I've been working on this particular project for a couple of weeks now. It started out as a small card (the square part), but it didn't seem complete. So I put my thinking cap on and worked on something to add. 
This is what I came up with...


It's a little wall hanging perfect for hanging on a door for Halloween. (Not outdoors, maybe an inside door though.)
Here's the lowdown on how it all came together:
First I chose some patterned paper to choose my colors from. In this case, it's Cosmo Cricket's 'Haunted' collection. I colored Gracie from Waltzingmouse Stamps' 'Gracie at Halloween' with some pretty red violet Copics. Isn't she just beautiful? I love the the Vintage look to this whole stamp set and I really love that they are made to color! (More please Claire!) Gracie was completely cut out and I mounted her onto a simple moon. The moon is just a circle die cut from water color paper that I spritzed with some Candleglow Glimmer Mist.


The square was cut out of black cardstock using the Spellbinders Fleur-de-lis square die. I actually cut two so I could sandwich the ribbon between them. I added some cream 'pearls' all around the border with a cream Viva Decor Pearl Pen.


I love the Nestabling rhinestones that coordinate with the Spellbinders dies. These are the black rhinestones that fit perfectly in the Fancy Tags II die cut. It's a bit tricky lining them up just right, if anyone has any tips on how to do that easily, please feel free to share! I just the Gothic feel it gives the whole project, eerie yet elegant!


I adhered all the elements to some 1.25" wide striped grosgrain ribbon from SU with some heavy duty Sookwang double sided tape. I just sandwiched it between the layers so the back looks just as nice as the front, not that anyone is going to see the back, hee hee! I added a bog bow to the bottom and last but not least a gorgeous purple felt rolled rose. 


For such a poor start to this project, I am very pleased with how it turned out! I'm glad I didn't give up on it, fortunately I set it aside and went back to after working on other projects for a while.  


I have several more projects using this wonderful stamp set planned, Halloween and Christmas are my favorite holidays so I have a blast with these!


Thanks for visiting!


Stamps: Waltzingmouse Stamps 'Gracie at Halloween'
Ink: Versafine, Memento, Distress
Paper: PTI, water color, The Paper Co. shimmer cardstock, Hammermill, Cosmo Cricket
Tools & Accessories: Copics, Glimmer Mist, Nestabling, Spellbinders dies, SU ribbon, antique silver brad, wool felt, MFT rolled rose die, Viva Decor Pearl Pen, Swarovski bicone crystal

Sunday, May 8, 2011

WMS Birthday Tea Party challenge

Hello everyone, I hope all the mothers out there had a wonderful Mother's Day. Mine was very relaxing, I got lots of time to stamp and color. I saw the 2nd birthday celebration going on over at Waltzingmouse Stamps blog with another fabulous template from the very generous Claire for this adorable Tea Bag Baggie. Of course, I had to join in on the fun. I love all things tea, and it was the perfect excuse to pull out her Afternoon Tea stamp set. 


I chose some pretty SU papers to paper piece the tea pot and tea cup. I went back with  a Copic marker to add some shading and dimension to them. 


The template was actually pretty simple to cut out and assemble, even without a digital cutter. I know, I know, I am still in the stone age, lol! Soon, I hope, I can get one...


Anyway, a very happy 2nd birthday to WMS and I hope her continued success! 


Thanks for looking!


Stamps: WMS Afternoon Tea
Ink: Memento
Paper: SU
Tools & Accessories: SU ribbons, Copic marker, Scor Pal, Crop-a-dile

Sunday, October 24, 2010

WMS 'Tag You're It!' Challenge

If you haven't heard about Claire's awesome prize giveaway, you won't want to miss it. Read about it here. Mucho WMS bucks to spend on all those delicious stamps! {swoon} The challenge is to create an elegant and beautiful Christmas tag. Not so very difficult using WM stamps! lol!
Here's what I came up with...
 One of my very favorite templates from Claire's store, the rubber band box. Very easy to put together, someday I hope to get an electronic cutter to make it even easier. I chose SU's retired Wintergreen papers because they are the most beautiful patterns and colors I have ever seen! Seriously one of my favorite Christmas/Winter paper collections, and I'm glad I stocked up!
I chose to use a simple snowflake stamp on the tag because I wanted to use 3D paint to add little 'pearls' for extra dimension. Well, I wish I had used actual little sticky pearls, because no matter how hard I try I cannot get uniformly shaped/sized pearls from Liquid Pearls/Viva Decor/3D paints! BUT, it's still very pretty, and I like it.

Wish me luck because I have a WMS wishlist a mile long and I need it, ha ha!

Thanks for looking...

Stamps: Waltzingmouse Stamps 'Seasons of Love', 'Very Vintage Labels no. 4'
Ink: Versamark, SU
Paper: SU
Tools & Accessories: Spellbinders Labels, circle Nestabilities, 1/4" hole punch, light blue taffeta ribbon, Viva Decor Pearl paint pen, Scribbles 3D paint, Scor Pal, white elastic, eyelets, Crop a dial, SU corner punch

Sunday, October 3, 2010

In honor of WCMD...

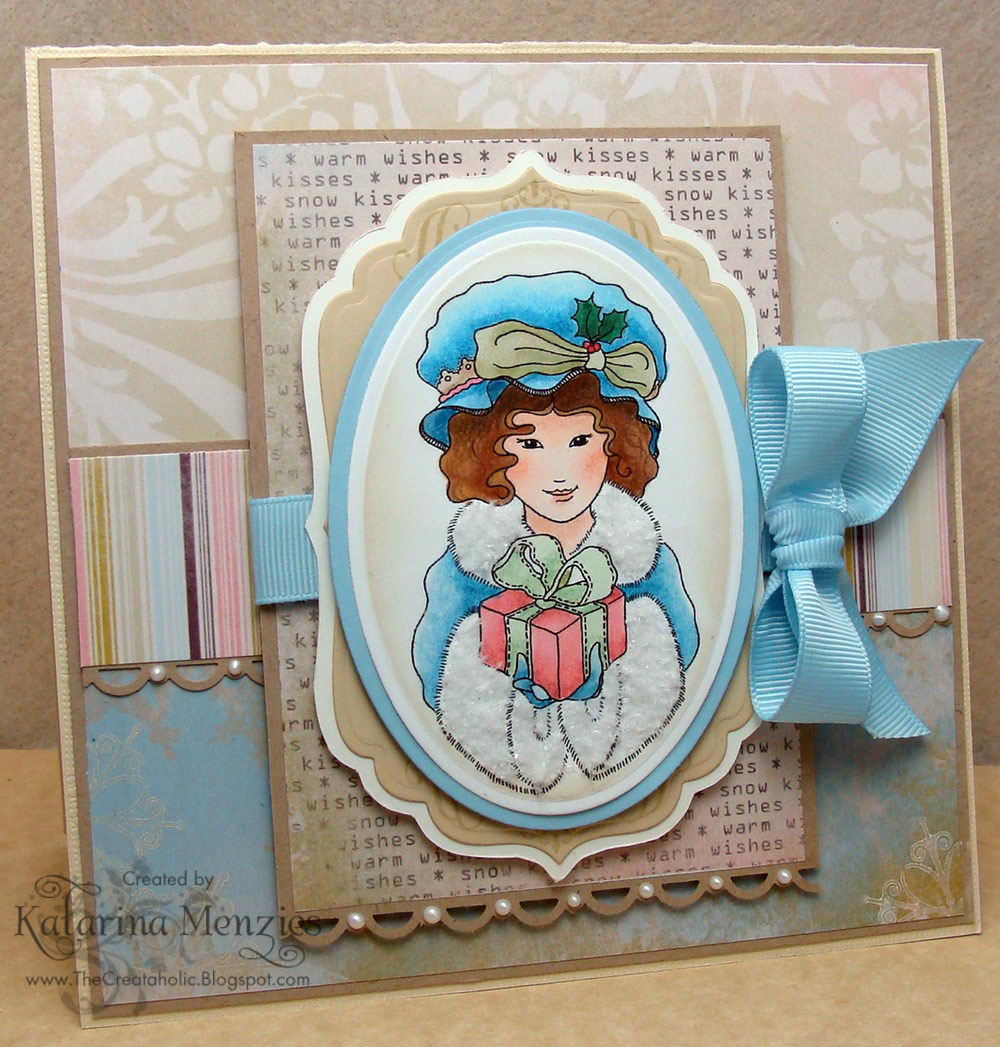
Did you all see the beautiful digital stamp Claire from Waltzingmouse Stamps is offering on her blog for World Card Making Day?! I nearly keeled over when I saw the lovely Harriet! I love WM stamps, and I love to color. Put the both together and I'm in heaven...


I used some non traditional colors for this Christmas card, more of a wintry, elegant and Victorian theme. That's what Harriet looks like to me! I snagged some gorgeous digital papers from The Digi Chick called 'Snow Kisses'. 
Here's a closer look at Harriet:

I colored her with a combination of Copics and pencils, applied lots of Polar White Flower Soft to her collar and cuffs. That stuff saves me from having to color white fur! I have yet to figure out how to color white fur properly! If you know of a tutorial LMK.

Thanks for stopping by!

Stamps: Waltzingmouse Stamps
Ink: SU
Paper: Digital paper collection from The Digi Chick, Epson matte photo paper, PTI, Heavenly White
Accessories: SU edge punch, Spellbinders labels & Nestabilities, PTI ribbon, Viva Decor Pearl pen, Flower Soft, Copics, colored pencils

Friday, June 25, 2010

Summer Swim

This card was so much fun to make. I love the colors and the image is just darling! I colored the little guy with Copics and cut the whole thing out to layer onto matted ovals. All the DP is stamped, every single one! The plaid background was created with one of Waltzingmouse's background stamps, stamped vertically and horizontally in two colors. The polka dot papers were also done with stamps from WMS.


I added Liquid Glass to the water in the pool, it looks so awesome IRL! You can just barely see it in this close up.
The jumbo ric rac is cut from my own stash of dyed wool felt with MFT's new ric rac die. Reminds me of waves, so it ties in beautifully with this card.

Thanks for looking!

Stamps: Digi illustration from Mo's Digital Pencil, Waltzingmouse Stamps
Ink: CTMH, PTI
Paper: Heavenly White, Gina K
Accessories: MFT jumbo ric rac die, Oval Nestabilities, wide polka dot ribbon, EK Success bubbles edge punch, Liquid Glass, Copics