Pages

Showing posts with label Digital/Hybrid. Show all posts

Monday, December 10, 2012

Ramona Loves to Glide...

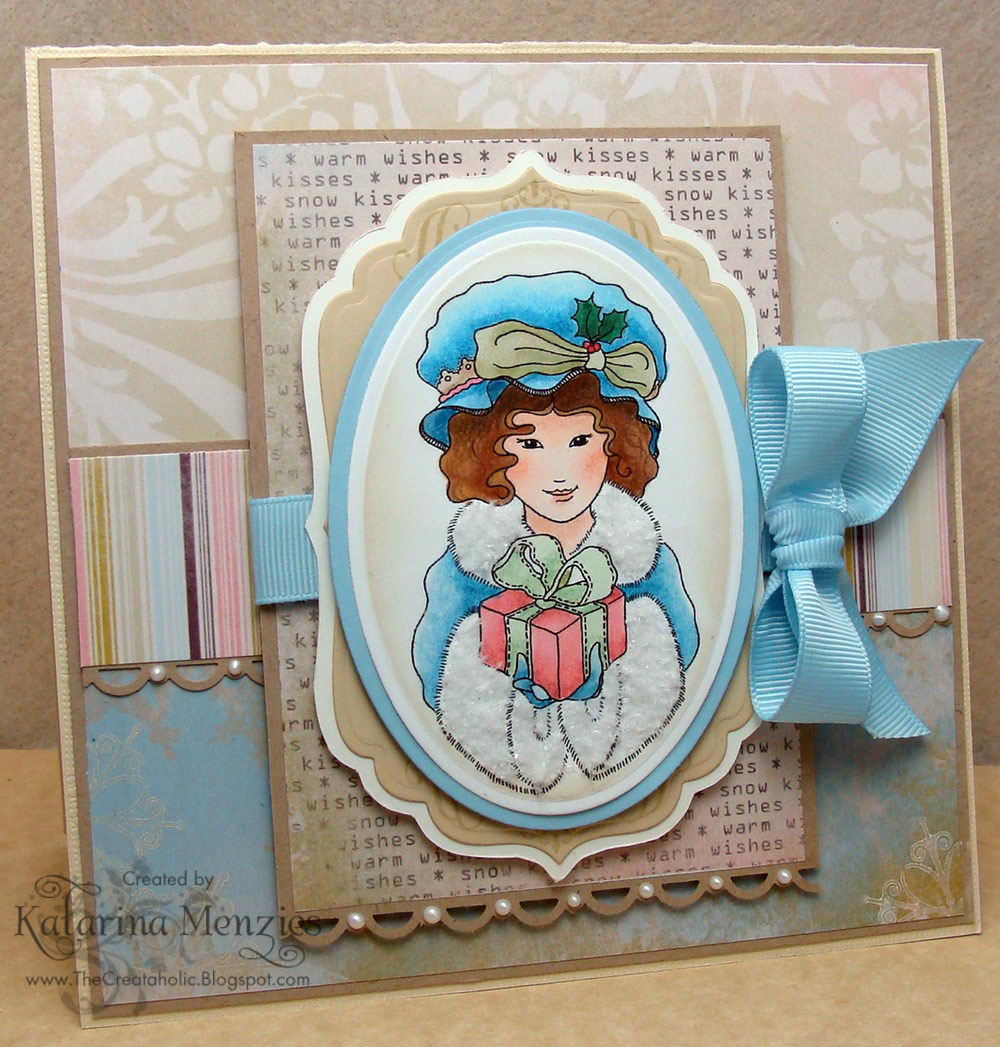
Good morning friends, I have a sweet simple card to share with you all today using Stamping Bella's 'Ramona Loves to Glide' stamp. 

I stamped this cutie directly onto the paper that I printed out using a digitally created pattern from Lily Bimble's Christmas Village collection. (I love saying Lily Bimble, it's such a fun name, lol!) I was on a mission to find paper that somewhat resembled an older pattern collection from October Afternoon called Verry Merry. Click on the link, do you remember it? You do? That means you must have it! Pleasepleaseplease email me if you do, LOL! 
Just kidding, but I had to come up with a substitution because that OA paper is nowhere to be found! Lily Bimble comes the closest.


Ramona is colored with my Copics, and I added lots of glitter all around her because she's skating on sparkly ice of course. I didn't want to cover up too much of the image with ribbon, so I opted for a cute baker's twine bow with a snowflake brad and some colored bells.


Now that I look at it, I wish I had added a sentiment to it. I still can, and I will do that today. I'm home today because I broke my toe at work on Friday. I dropped a heavy box on it and let me tell you it hurthurthurt! Owwie! It's all sorts of ugly rainbow colors today, but it doesn't hurt nearly as much anymore, thank goodness.

Thanks for stopping by, hope your Monday is not terrible today!

Thursday, October 11, 2012

Haunted Hills

Hello everyone, how about a Halloween card today? Halloween cards are one of my favorite kinds of cards to make. I don't really give out any :-o  but I love making them all the same. This one is a hodge podge of several different digital and clear products.

The cute witch and her sidekick is from Mo's Digital Pencil (at least it was, I can't seem to find it in her web store anymore!), I think it's called Trick or Treat. I colored them up with Copics.


The papers are digital as well, from Design House Digitals 'Halloween Vintage Findings'. If they look familiar, it might be because I believe there's a paper pad from My Mind's Eye that has these same papers. I freehand cut some rolling hills using different patterns to create the background. I also stamped the haunted house and trees in the BG with a clear stamp set from Inkadinkado, I think. 


And last but not least, the Haunted House ticket is a printable from the Silhouette store. I really wanted coordinating ribbon too, but of course had nothing even close in my stash. So I striped a plain piece of grosgrain with a ruler and Copics. It actually bled a little and I thought I ruined the ribbon, but after tying it into a bow, turns out I LOVE the effect! One of those happy accidents I will be using again in the future, kind of an 'ombré' look to it. 

Hope you like it, thanks for stopping by!

Wednesday, July 4, 2012

Happy Birthday America!

Have a safe and happy Independence Day my fellow Americans! To help celebrate, I've made a patriotic card using Sweet Wryn from Tiddly Inks.


She's colored with Copics and Stickles and cut out so I could pop her up right on the background papers. 


The papers are a digital collection from Raspberry Road Designs called 'Stars and Stripes'. 


Have a happy holiday, thanks for stopping by!

Stamps: Digital image from Tiddly Inks, sentiment printed from my PC
Paper: Digital papers and image printed on Hammermill color copy, PTI
Tools & Accessories: Scor Pal, Martha Stewart edge punch, Nesties, SU striped ribbon, Prima pearl flourish, Copic sketch and Spica pens, Stickles, Sharpie poster pen, self adhesive rhinestone

Sunday, June 17, 2012

Happy Father's Day

Good morning friends, let's make sure to make the Fathers in our lives feel extra special today! My own father is far away in NC, but I've already sent him a card and hopefully he got it!

This card was so, so simple to make. I'm almost embarrassed, LOL. My kids gave it to Jim, who they consider their stepdad.


Most of the work has been done by the background paper, it's a printed design from Raspberry Road Designs 'The Old Tacklebox'. I also printed the sentiment right along with the background.

Then I simply stamped some of the large pine trees on the left side in black using Impression Obsession's Cover-a-Card stamp

I added the deer from SU's Nature Silhouettes, sponged in some 'grass' along the bottom, and it was finished. 


I told you, too simple!


Have a great day!

Wednesday, June 13, 2012

Hello Sunshine!

Good morning all! How about a colorful summery card today? This cutie is a digital stamp from Tiddly Inks called 'Beach Babe'. She's colored in Copics.


The papers are also digital, and the best part is, they are a free kit from Summertime Designs called 'Flipflop-sicles'. She has tons of awesome digital collections on her blog, all for free!


Gotta make it short today, time to hop in the shower and get ready for work already! Thanks for visiting, have a great day!

Stamps: Tiddly Inks
Papers: Digital papers from Summertime Designs printed on Hammermill color copy, PTI, SU
Tools & Accessories: Flip Flop die from PTI, wool felt, seed beads, Copics, SIlhouette Cameo, PTI satin ribbon

Saturday, April 14, 2012

Now that's a strawberry stamp!

Hello everyone! I recently saw a new strawberry stamp set soon to be released from a popular co. , and was tempted to give in and buy it. But I am trying to wean myself away from purchasing more stamps that I don't need so I decided to try and find an alternative. As it happens, I already had a digital stamp from Beccy's Place, and the best part.... it was free! I love this strawberry cluster so much better than the one I was contemplating buying, so why waste the money? I love fruit stamps, berries being one of my favorites, so I'm always on the lookout for pretty ones to add to my collection. I'm not picky when it comes to stamps, digital, clear, rubber - I love 'em all.


I remembered that Raspberry Road Designs had a strawberry themed paper set, and they had an awesome sale for Easter last weekend, so I stocked up on some of my favorite collections. This one is called 'Strawberry Farms' and it is to-die-for. 


I added a white cherry blossom (can't remember where I got it) because it resembled Strawberry blossoms and some pretty flourishes for vines. The sentiment seal is from Catslife Press. I may be sending this one off to my Mom for Mother's Day this year, or I might change the sentiment to a general 'Mom' one because her birthday is right around Mother's Day. Kill two birds with one stone, so to speak. 


Hope you like it, thanks for taking a peek!


Stamps: Digital image from Beccy's Place, Catslife Press
Ink: Memento, Distress
Paper: Hammermill CCC for all digital printing, kraft, SU
Tools & Accessories: Spellbinders Labels/Nestabilities, Marianne Creatables flourish dies, Copics, Stickles, Spica pens, gingham ribbon, Viva Decor pearl pen, paper flower from unknown source, EK Success doily edge punch

Tuesday, April 10, 2012

Yee-haw!

Good morning blog friends! I think I may have figured out the best way for making faux wood look really, really close the the real thing. I've done this before, but never with the awesome results I got here. I added an extra step to a popular technique I see used all over the paper crafting world and love the result.


That wood looks pretty darn real, doesn't it?! Here's how I did it:
I stamped PTI's woodgrain background in Antique Linen Distress Ink on Rustic Cream cardstock. Stamped again (slightly off from the original) in Corduroy. Sponged Antique Linen, Corduroy and Walnut over the whole thing, making sure to leave some areas light.
Stamped again with Cream pigment ink, let it dry.
THEN, the real magic happened when I ran it through my Big Kick with the woodgrain impression plate. Yee-haww! Love the result! 
Anyway, it made the perfect frame for this adorable cowgirl Wryn, I love this little girl to pieces! She's colored with Copics.


The papers are from Raspberry Road Designs, 'Cowgirl Cool', how cool is that cowhide print? I stamped the sentiment with a Just Rite custom stamper. Remember those tiny little letters that you have to be super careful with popping them into the round stamper thingy? Well, I haven't figured out how to do computer generated sentiments in a circle (well I have, but they printed out really poorly) so I had to dig the classic stamper out. 


This card goes into the favorites pile! Hope you like it too, thanks for visiting!

Stamps: Digital image from Tiddly Inks, Just Rite, PTI
Ink: Distress, Memento, Perfect Match
Paper: Hammermill (for digital image and PP), Bazzill, Core'dinations
Tools & Accessories: Nestabilities, Spellbinders Labels, PTI ribbon/woodgrain impression plate, silver brad, SU scallop punch

Tuesday, January 10, 2012

Vintage Valentine Car Dangle

Good morning everyone! Well now that Christmas is over, it's time to change out the bling in my car. I worked on this dangle over the weekend for Valentine's Day. There isn't much stamping, I really wanted the vintage Valentine look so I went searching for some clip art on Etsy. After many hours trying to decided which I wanted (for this project and others, lol) I chose a collage sheet of various old cards and quickly printed out my favorite. 


From there it was fairly simple to move along with the project. Some stitched-on seed beads around the perimeter of the image, a little Rock Candy Stickles for the wings, a silver embossed sentiment from PTI, a pretty little rose from Wild Orchid Crafts that I dyed with Glimmer Mist.


The back has to look pretty too, because it dangles, sways and spins from my rear view mirror. I used another printed collage sheet and silver embossed a sentiment from Impression Obsession. I love this quote...

When you arise
in the morning, think of
what a precious
privilege it is
to be alive---
to breathe, to think,
to enjoy, to love!

So true! Here's a close look at the Swarovski Crystals I used for the actual dangle;


I get most of my bead supplies from Fusion Beads, they have free shipping on everything, love that store! These beads are the Crystal Magma color and are such an unusual shade of red, a little different from the bold, eye popping red usual for Valentine's. 


I hope you like it, and thanks for peeking in! Have a wonderful day!


Wednesday, January 4, 2012

Love & hugs

Good morning! I've been laid up at home for the past few days, unable to do much of anything. I felt my lower back getting a bit sore and weak all last week, and sure enough on Monday it finally decided to give out at work. I should've gone to the Dr. right from work, but I was hoping it would ease up and I could avoid the whole thing, but it just got progressively worse. So every move I make is very painful and worst of all, I can't sit and stamp or color. Devastating, I know.

I do have a somewhat clean and simple card to share though. When I finished the card to this point, I wanted to add something more to it, as is my nature, flowers perhaps. But I was very pleased with the clean lines and the soft colors of the papers that I opted to leave it as is.


This is the first time I've colored up one of the newest characters from Lili of the Valley's latest release, 'Summer- My Best Friend'. Although I liked the Summer series of stamps, I needed some time to get used to them I guess, I kept going back to the familiar ones. 


This stamp comes with the 'Love & Hugs' sentiment, which is nice. I colored Summer with mostly Copics, but did go back and add the shading in her hair with my colored pencils. It's much easier to get those fine, wispy strokes with a sharp pencil to add some nice texture to hair. Also, I stamped her in a lighter ink than I usually do, 'Latte' from Adirondack. It's got a much softer effect, and very pretty. I didn't know until recently that Adirondack dye inks were smear proof with Copics! Sweet!


The papers are from a digital collection from an Etsy seller 'Digital Potpourri'. I have to be careful, I am seriously going overboard with digital papers! There are just so many! And so much more affordable!


Thanks for peeking in, have a great day.


Stamps: Lili of the Valley
Ink: Adirondack
Paper: Hammermill, SU
Tools & Accessories: striped twill ribbon, PTI banner die, Copics, colored pencils, Tonic Duo corner rounder punch, sewing machine, Spica pens

Sunday, January 1, 2012

Love and Chocolate

Happy New Year everyone! It's time for a fresh start, and although I don't make any resolutions I do try to change little things here and there. It's never too late to change old habits and start some new, and the beginning of a new year is as good a time as any. 
We had a wonderful time last night over at our next door neighbor's. Lots of food, wine and dessert with good friends is my idea of a great New Year's Eve celebration. 

So, let's move on shall we? What's next on the agenda.... Valentine's Day! I sometimes find myself having a hard time with this Hallmark holiday, all those reds and pinks is enough to make my teeth hurt, lol! Not that crazy about traditional Valentine's Day colors, but I did come across this pretty digital paper collection from Ginger Scraps. It does have red and pink aplenty, but I found myself drawn to it because of the other complimentary colors, blue greens and rich, chocolaty browns. MUCH better!


The adorable stamp is LOTV's Mice are Nice collection, called 'The Chocolate Factory'. It's colored with mostly Copics, but I went back with some colored pencils to add some shading to the very tiny mice and other details. I find colored pencils are easier to blend and shade with in tiny areas because I can really control the color with a sharp point. 


The sentiment was printed from my computer on to one of the Ginger Scraps label embellishments included in the kit. 


Thanks for stopping by!


Stamps: Lili of the Valley, Papertrey Ink
Ink: Memento, SU
Paper: Hammermill, SU, PTI
Tools & Accessories: Spellbinders heart border, Marvy Uchida scalloped heart punch, PTI button, baker's twine, Copic sketch & Spica pens, Sakura Glaze pen, Heart Doily from Little Yellow Bicycle, PTI ribbon

Tuesday, December 13, 2011

Joyeux Noel

Hello friends! I have to admit, my mojo is playing games with me, I have plenty of ideas but nothing seems to come of them. I think I'm suffering from Christmas burnout. I've been making merry cards since September, and I think I need a change. Which is upsetting because I still have so many projects I want to get done! So many ideas, so little time. I think the fact that Christmas is only 10 days away is frustrating me, making me a nervous wreck! 

Well, this card was done a while ago, and I wonder if it will be the last for the holiday...


I used 'Christmas Bears Bird Table' on this card. I can't believe how much I love these little animal images even after all this time. I've got to tell you, I go through stamps much faster than I change my socks, but I just never get tired of Lili of the Valley's sweet stamps. 


The papers are Raspberry Road designs, 'Cranberry Cottage'. I did a little stitching around the edges of the card, added some mini pom pom trim to the bottom, some jingle bells, and my favorite snowflake dies, SU's Northern Frost. 
I sponged the color around the image in Fluid Chalk, Amber Clay. The chalk inks are awesome for sponging, it produces such a soft, velvety color.


Thanks for stopping by!


Stamps: Lili of the Valley, Papertrey Ink
Ink: Memento, Fluid Chalk, SU
Paper: Hammermill, PTI
Tools & Accessories: SU snowflake die, PTI ribbon, jingle bells, Nestabilities, SU Markers, Copics, Stickles, baker's twine, pom pom trim, embroidery floss

Thursday, December 1, 2011

Christmas in the heart....

Happy December! Can you believe it?! The countdown to Christmas is ON! Yikes...

I think this is the card for my folks this year. I am very pleased with the way it came out. All the papers are digital, from Raspberry Road Designs, my new favorite digital paper place. This one is called Christmas Chic. 


I sewed on some tiny seed pearl beads all around the edge of the card. The only stamping I did was this beautiful quote from Impression Obsession in gold embossing powder.  


I cut out the circle frame and cut out another layer to pop up on some foam tape for dimension. I added some German Glass Glitter here and there for a little icy sparkle. 


 I even decorated the inside of the card with another stamped sentiment, from Waltzingmouse Stamps. The gold frame is from Marianne Designs.


I think my Mom will like it. Hope you do too, thanks for stopping by!


Stamps: Impression Obsession, Waltzingmouse
Ink: Versamark
Paper: Bazzill, Heavenly White, Cascata, Stardream
Tools & Accessories: Marianne Designs Creatables die, Filigree gold embossing powder, pearl seed beads, twill ribbon, SU Northern Frost die, German glass glitter, self adhesive pearls

Friday, November 11, 2011

Winter Wonderland

Good morning everyone, Happy Friday! It's also Veteran's Day, so let's not forget to thank a Vet for their service to our country. Thanks to all our military Veterans for fighting for our freedom!

I have another very time consuming card to share with you. These gorgeous backgrounds from Motivet are just so gorgeous, and they've recently released a few more. They're so beautiful. This one is the Christmas decorated house that I used with last year's Lili of the Valley stamp 'All Wrapped Up'. This elegant little lady is perfect with the grand Victorian house. 


I colored everything with my Copics, then added a bunch of 'snow' with my favorite paint spattering technique. 


I framed the background image with a Creatables die cut from gold cardstock. I added a little pine and rose spray on the bottom with tiny red jingle bells. I finally found the perfect pine branch dies from Cheery Lynn so it's easy to make these pretty little clusters.


With a card that took this much time to make, I couldn't neglect the inside of the card, so I added some pretty matching paper that I clear embossed with a pinecone cluster from Northwoods stamps. Hard to see in the picture... The die cut is from the Kaisercraft paper pad, 'December 25th'. 


Thanks for stopping by, have a great weekend!

Stamps: Motivet digital landscape stamp, Lili of the Valley
Ink: Memento, Distress, Versamark
Paper: Hammermill, Stardream, Kaisercraft, SU, Heavenly White
Tools & Accessories: Marianne Creatables die, Copics, wide striped grosgrain ribbon, seed beads, Nestabilities, Wild Orchid Crafts rose, Cheery Lynn pine branch die, jingle bells, Stickles, red pearls, sewing machine, American acrylic paint, old toothbrush

Monday, October 31, 2011

Halloween snowstorm

Good morning everyone! What an awful weekend off it turned out for me. Imagine my surprise when Saturday it starts snowing, and snowing....and snowing....
We ended up with this:


Trees came down on power lines, power went out mid afternoon, and that was the end of a productive crafting weekend. Yesterday we took a drive down to my parent's house in Jersey, my brothers were up from NC for the weekend, so we went for a visit. The power was out everywhere, from PA to NJ, we were lucky to find a gas station open to refuel!
Power was finally restored to us late last night, but there is no power in NJ where I was due for work this morning, so I stayed home.


That's the story morning glory, here's a card I finished up early this AM. 


This stamp is from Sugar Nellie 'Knitted with Love'.


Fully decorated inside and out easel card. Fancy schmancy!


I made the little wool stocking with a Lifestyle Crafts (Quickutz) nesting stocking die. Sewed it together by hand with some aqua beads and embroidery floss. Added some greenery and a tiny wool felt rolled rose to the top.
The snowflakes are also cut from felt with a Stampin Up die (Northern Frost). I sewed some tiny seed beads to those too. Sometimes I just get in the mood for some decorative hand stitching/beadwork. It's very time consuming, so I don't do it often, but I LOVE the homespun charm it adds to cards. 


The papers are a digital collection from Raspberry Road Designs, 'Christmas Thyme'.


Thanks for peeking in, have a SPOOKY FUN HALLOWEEN!


Wednesday, September 28, 2011

Warmest of wishes...

Good morning folks, I'm putting a pretty good dent in the Christmas card pile, and it's still nice and early so I should be good in time for Christmas. How's it going for you?
This is a very traditional style card, which I love, using a variety of stamps. 


The Poinsettia is from Papertrey Ink, embossed in pearl white and water colored with Peerless w/c's. I did three separate layers and cut them out for more dimension. 
The sentiment is from Lili of the Valley's clear sentiment set and the gorgeous frame embossed in gold around the label die cut is from Waltzingmouse Stamps. 


The papers were printed from a digital kit from Raspberry Road Designs, 'Christmas Remembered'. 


Thanks for stopping by!


Saturday, September 17, 2011

Old World Christmas

Hello blog friends! I came across a gorgeous digital scrapbook kit called 'Christmas Past' from Scrap Matters and fell in love with the plaid and ticking patterns. I love old world Christmas style, and this kit would be perfect for the Pines & Poinsettias set from SU. Lots of lace, gold papers, and chunky glass glitter was what I envisioned. Here's the end result...


I used SU markers to ink all the individual elements, then spritzed the stamp lightly with a Mini Mister to moisten the ink. This works much better for me than 'huffing' on the stamp as I used to do. It gets rid of the stroke marks from the markers too. 


The gold ruffle on the bottom edge of the image is just a strip of Waffle paper pleated behind it.  


It's hard to see the glass glitter on the pinecones, but it looks so cool IRL. Just like ice crystals have formed after a particularly freezing night. 


Speaking of freezing... it got COLD here a couple of nights ago! One day it's steaming hot and muggy, the next the temp drops down to the low forties overnight! What a shock to my system. I had to start digging out sweatshirts and cozy blankets to wrap up in. Well, that's the weather here in the Poconos!


Thanks for visiting!

Stamps: Stampin Up
Ink: Distress, SU markers
Paper: PTI, SU, Scrap Matters digital collection
Tools & Accessories: Spellbinders Label die, satin ribbon, glass glitter, Crystal Lacquer, Prima lace, Sizzix embossing folder, EK Success tiny scallop punch

Friday, September 16, 2011

Moonlight Wishes

It's Friday! And I have the weekend off, woo hoo! Saturday is my sweetie's birthday so I'll be taking him to our favorite Italian restaurant for dinner. It's been quite a while since we went out for dinner.

The card I'm showing you today is almost completely digital. All of the papers were printed from the Snow Folk kit at Nitwit Collections. I LOVE all the adorable little embellishments from the kit. I printed off two of the candy canes and cut them out. I wanted them to be nice and glossy so I heat embossed them several times with Ultra Thick Embossing Enamel. 


Moonlight Wishes was colored with Copics to coordinate with the papers. 


This stamp would also be great for a baby card, I'd just mask out the stocking. Cute! Thanks for dropping by!


Stamps: Lili of the Valley- Moonlight Wishes
Ink: Versamark
Paper: Nitwit Collections, Stardream, Hammermill, Heavenly White card base
Tools & Accessories: SU Northern Frost die, bakers twine, Copics, Stickles, Wild Orchid Crafts pearls, UTEE, Spellbinders Labels, sheer ribbon

Tuesday, June 21, 2011

The perfect summer day...

Good morning everyone! 

I've always wanted to try a diorama style card since seeing the tutorial on Splitcoast Stampers a long time ago. I am however, The Great Procrastinator..haha. Well, I could put it off no longer. I was going through some of my older stamps and came across this Magnolia background from my design team days with them. Then I came across this 'Little Girl - SwingTime' stamp from Lili of the Valley and I had a light bulb moment. It was time for a 3D card! 


I searched through my stash for a large tree stamp, came up empty. No time to buy one, I had to go with this creative spurt ASAP! So I started searching for a digi. Sure enough, I already had a digital stamp from Cuddly Buddly that had the perfect tree for my project. So I start coloring...


When it came time to assemble the diorama card, I had to do a lot of experimenting with different paper sizes because the SCS tutorial was too small for what I needed. But I was able to get the basic directions and I soon figured out which sizes I need to make a 4 1/2" square diorama. 


Now, there's only one problem with the finished result. It was supposed to collapse down so it could fit into an envelope, and it did. BEFORE I used foam tape to layer the grass die cuts! Grrr.... Mistake. It doesn't fold flat at all because of it, soooo- it's no longer a 'card', just a diorama, lol. 
Pretty as a picture though, methinks.


Thanks for looking!


Stamps: Lili of the Valley, Magnolia butterfly BG, Cuddly Buddly digital image
Ink: Memento, SU
Paper: Neenah Solar White, Memory Box
Tools & Accessories: MFT grass die, colored pencils, OMS, Stickles, Copic sketch/Spica pens, PTI rustic string, Nestabilities, Scor Pal

Sunday, October 17, 2010

A Traditional Christmas Card

So I'm searching for some very traditional, classic type Christmas papers the other day, especially digital ones for that instant gratification, when in my Google search results I get a link to Stampin Up's store. I soon find out that they have digital kits available for sale, with papers and stamps from their current catalog! And you don't need their digital software to use them! I've had my eye on this particular set, Deck the Halls because I loved the classic, vintage looking papers but never got around to ordering them. Well, I chose the digital option instead. Faster, cheaper, and I have an unlimited supply! I do love digital stuff almost as much as the real thing...
Anyway, here's what I came up with:

All the patterned papers, the Poinsettia and the sentiment are printed from my computer. So this is what you would call a digital hybrid card, I think. I colored three copies of the Poinsettia with Copics and cut them out to layer the bracts. I added some glass glitter to some of parts of the flower for that vintage sparkly effect.
OH, and an FYI for you Copic lovers- one thing I hated about Copics was the horrible bleeding I would get, especially with certain colors. Like Reds! So I didn't use them much, although I liked the look of them. Well, somewhere in my internet travels I remember watching a video of someone using Copics to color a drawing (not stamping related) and I was stunned that she got absolutely NO bleeding, and the blending seemed much easier and smoother. (I'm sorry I didn't save the video, I can't remember how I found it). Apparently she used some inexpensive Hammermill color copy paper, so I decided to find some and try it. I wasn't prepared to pay the exorbitant price for the new Xpress it blending cardstock that supposedly did the same thing. Well, I'm happy to say that I am extremely pleased with this paper! It's a bit thinner than I would like, even though it's the 'Cover' weight paper, but supposedly this is what makes it easier to blend on. If you click on the picture for a close up, you will see NO bleeding with the reds at all. I'm a happy camper!

A little bit of gold dimensional paint for the flower centers, some highlights with Copic Spica pen on the pine branches,  lots of shimmer and shine on this card!
Pretty neat for an almost all digital card, huh? Amazing what technology allows us to do nowadays.

Thanks for stopping by!


Stamps: Digital brush from SU
Ink: Distress
Paper: SU Deck the Halls digital kit, Hammermill color copy paper, Gina K, Stardream metallic gold card, Heavenly White
Accessories: Spellbinders Labels, glass glitter, Copics, Adirondack dimensional paint, seam binding

Sunday, October 3, 2010

In honor of WCMD...

Did you all see the beautiful digital stamp Claire from Waltzingmouse Stamps is offering on her blog for World Card Making Day?! I nearly keeled over when I saw the lovely Harriet! I love WM stamps, and I love to color. Put the both together and I'm in heaven...


I used some non traditional colors for this Christmas card, more of a wintry, elegant and Victorian theme. That's what Harriet looks like to me! I snagged some gorgeous digital papers from The Digi Chick called 'Snow Kisses'
Here's a closer look at Harriet:

I colored her with a combination of Copics and pencils, applied lots of Polar White Flower Soft to her collar and cuffs. That stuff saves me from having to color white fur! I have yet to figure out how to color white fur properly! If you know of a tutorial LMK.

Thanks for stopping by!

Stamps: Waltzingmouse Stamps
Ink: SU
Paper: Digital paper collection from The Digi Chick, Epson matte photo paper, PTI, Heavenly White
Accessories: SU edge punch, Spellbinders labels & Nestabilities, PTI ribbon, Viva Decor Pearl pen, Flower Soft, Copics, colored pencils