Pages

Monday, August 29, 2011

Angelic Harpist

Well I'm back in the groove again! It's easy to stamp when I don't have to work, go places, run errands, etc. Having a weekend off really gets the creativity into gear. 
Our power has been out since around noon Sunday, I had a very scary experience when I had to run out and pick up my son from his friend's house. I was driving along nervously, amazed at all the downed trees, raging creeks and lakes in our area, grateful that things weren't worse. As I pull up to an intersection, there was a pickup truck in front of me making a right turn when a HUGE tree slowly starts falling over not 100 yards away. It crashed down over the entire road, bringing power lines down with it. I sat in my car shocked, watching the other power lines swaying dangerously right overhead. If I had been going that way, or if the truck in front of me had gone through 30 seconds sooner, well- I don't even want to think what would've happened. Thank God no one was under that tree at that moment. 
At the time I'm writing this, everyone else still has no power, but fortunately we have a generator and have most electrical conveniences available. No washing machine, dryer or oven, but hey! Who wants to cook and do laundry if you don't have to, hee hee!

Enough drama, here's another peek at one of the new stamps LOTV is releasing soon. This one is called Angelic Harp. Beautiful isn't it?


I'm finally getting the hang of using my Gazelle, and this card base was one of the first things I downloaded from Paperthreads when I got it. I have a snowflake addiction I admit. I have more snowflake punches than I could count, and while browsing the many, many free cut files available  on the web, I downloaded many more. I just can't get enough of them! 


I colored the angel with pale Copic colors, I wanted to keep everything very light and delicate, like snowflakes. I even added a little silver bell to the satin bow (Wild Orchid Crafts) for a little jingle. 


Thanks for stopping by, have a great day!


Stamps: Lili of the Valley
Ink: Glimmer Mist
Paper: PTI shimmer c/s, Hammermill, Stardream, PTI 
Tools & Accessories: Nestabilities, satin ribbon, Swarovski crystal, Gazelle cutter, Viva Decor Pearl Pen, Copics, lace, Prima pearl/rhinestone flourish

Sunday, August 28, 2011

Lili of the Valley Christmas Release II

Good morning friends!
As I type Hurricane Irene is working her voodoo even here in NE PA. The wind is pretty strong, and it's been raining since yesterday. I'm typing up my post as quick as possible in case the power and/or internet (NOOOOO) goes out. Most of yesterday morning I was without internet and I could not figure out why. I unplugged this, reset that, checked wires, connections all to no avail. I could not figure it out, finally got in touch with the cable company to see if there were any outages. There weren't, so a technician was sent, and sure enough, it was our 10 year old cable modem. I don't like being without internet...

Anyway, enough rambling, onto today's sneak peek. There's a new Christmas release coming from LOTV again, better thaw out your credit cards ladies! This cutie is called 'Little Holly'. 


I put my Gazelle to good use finally, cut out a bunch of fancy stuff with it. The three layer snowflake, and the pretty little flourishes.


Hope you've been enjoying all the peeks at the new stamps, I always get so excited when new LOTV stuff comes out! I'm never disappointed with the releases. 


I hope you're safe and sound on the East Coast, hopefully not too much damage has been done. I'm off to read the news now.


Thanks for visiting!


Stamps: Lili of the Valley
Ink: Perfect Match
Paper: Hammermill, Stardream, Heavenly White, PTI, Memory Box, Raspberry Road Designs digital papers
Tools & Accessories: Nestabilities, McGill circle punch, Copics, silver jingle bell, satin ribbon, Gazelle digital cutter, pearls, Stickles

Tuesday, August 23, 2011

A Year of Flowers Notecard Set

Hello everyone, sorry I've been so quiet, working on quite a few things behind the scenes. Believe it or not Christmas comes early when you're designing cards for stamp companies. We have to be, customers want to see Christmas things with plenty of time to create in time for the holidays!
Well, this project isn't necessarily for Christmas, but I needed to make a gift for a very generous friend of ours who happens to love my cards, lol. I decided to use every one of the stamps in Papertrey Ink's YOF set to create a boxed notecard set. 


I have never made a large set of cards like this, so I knew I would have to keep it somewhat simple for the amount of time I had to make them. Instead of intricate, detailed coloring of each flower image, I opted to gold emboss and water color. I didn't have to worry about painting out of the lines with embossing, so I went to town with the markers and water brush.
Here are the December and November flowers, Poinsettia and Chrysanthemum. 

September Morning Glory and October's Marigold:


July's Larkspurs and August's Gladiolas:


May's Lily of the Valley and June's Rose:


March's Daffodil and April's Sweet Peas:


And finally January's Carnation and February's Violet:


 I made the box for the cards using the Boxer from Crafter's Companion. Pretty simple, although it took me a long time to figure out how to do it the first time. I even added a little divider in the middle of the box to keep the cards from sliding into each other.


I really hope she likes it, this was truly a labor of love!


Now I really need some input from my faithful readers, if you have a minute to leave me a comment. Here's the question I have....


Should I add sentiments to these cards? I always have the problem of making a card with a birthday, or congratulations sentiment only to be asked to change it to something else, lol. What do you all think? 
Thanks for your input!


Most supplies from Papertrey Ink

Thursday, August 18, 2011

IO Thursday Challenge Hostess Gifts

Hello everyone! It's time for our Impression Obsession Thursday challenge. This week we're making hostess gifts. I love making projects like this, a pretty package and a coordinating card make such a nice presentation. 


I made a little gable box with a window using my Gazelle and filled it with some fall colored Reese's Pieces. Some pretty patterned papers from Stampin Up and a gold silk bow finish the box off nicely. 


The wreath image was colored with SU and Tombow markers using a blender pen to give it that nice watercolor look. I love fall colors, deep reds, golds, rich browns, just gorgeous!


See the good thing about being a paper crafter is that we can always come up with last minute gifts using the supplies we have on hand. Some pretty papers, nice ribbon and tag and you can bang out a box or a bag in no time. You don't even have to have the chocolates or candy in the house, just stop at the convenience store on the way over to the dinner party and fill 'er up, lol!


Thanks for stopping by!


Stamps: Leaf WreathHappy Thanksgiving
Ink: Memento
Paper: Core'dinations, SU
Tools & Accessories: Silk ribbon, Spellbinders labels, EK Success scallop punch, SU markers, Tombow blender marker, Crystal Laquer, Stickles, Gazelle


For more hostess gift ideas check out what the other DT members are making:


Sunday, August 14, 2011

Witches flying by...

Hello folks! Finally a day off from work, and there is so much to cram into just one day, I feel seriously overwhelmed. I've been working on this particular project for a couple of weeks now. It started out as a small card (the square part), but it didn't seem complete. So I put my thinking cap on and worked on something to add. 
This is what I came up with...


It's a little wall hanging perfect for hanging on a door for Halloween. (Not outdoors, maybe an inside door though.)
Here's the lowdown on how it all came together:
First I chose some patterned paper to choose my colors from. In this case, it's Cosmo Cricket's 'Haunted' collection. I colored Gracie from Waltzingmouse Stamps' 'Gracie at Halloween' with some pretty red violet Copics. Isn't she just beautiful? I love the the Vintage look to this whole stamp set and I really love that they are made to color! (More please Claire!) Gracie was completely cut out and I mounted her onto a simple moon. The moon is just a circle die cut from water color paper that I spritzed with some Candleglow Glimmer Mist.


The square was cut out of black cardstock using the Spellbinders Fleur-de-lis square die. I actually cut two so I could sandwich the ribbon between them. I added some cream 'pearls' all around the border with a cream Viva Decor Pearl Pen.


I love the Nestabling rhinestones that coordinate with the Spellbinders dies. These are the black rhinestones that fit perfectly in the Fancy Tags II die cut. It's a bit tricky lining them up just right, if anyone has any tips on how to do that easily, please feel free to share! I just the Gothic feel it gives the whole project, eerie yet elegant!


I adhered all the elements to some 1.25" wide striped grosgrain ribbon from SU with some heavy duty Sookwang double sided tape. I just sandwiched it between the layers so the back looks just as nice as the front, not that anyone is going to see the back, hee hee! I added a bog bow to the bottom and last but not least a gorgeous purple felt rolled rose. 


For such a poor start to this project, I am very pleased with how it turned out! I'm glad I didn't give up on it, fortunately I set it aside and went back to after working on other projects for a while.  


I have several more projects using this wonderful stamp set planned, Halloween and Christmas are my favorite holidays so I have a blast with these!


Thanks for visiting!


Stamps: Waltzingmouse Stamps 'Gracie at Halloween'
Ink: Versafine, Memento, Distress
Paper: PTI, water color, The Paper Co. shimmer cardstock, Hammermill, Cosmo Cricket
Tools & Accessories: Copics, Glimmer Mist, Nestabling, Spellbinders dies, SU ribbon, antique silver brad, wool felt, MFT rolled rose die, Viva Decor Pearl Pen, Swarovski bicone crystal

Thursday, August 11, 2011

Lily of the Valley Thank You Challenge

Good morning! This week we're making Thank you cards. You can never have too many of these in your stash! I chose to use 'Milly Flower Power', she's just too cute!


She's colored with Copics. I did a bit of hand stitching around the border of the card, I should really do it more often. Such a little thing adds so much to a card.


Check out that ribbon, is it not divine?! I am such a ribbon junkie, I have too much of it, but it's never enough!
The sentiment is also LOTV, from the Mixed Circular Sentiments set. Papers are Memory Box.


Hop over to the LOTV blog to check out more thank you cards from the DT, get inspired and make your own card. You can enter it to win some awesome goodies from The Ribbon Girl!


Thanks for visiting!


Wednesday, August 10, 2011

Gliding by...

Hello blog friends, I know it's been a while since I've shared anything. We took a long weekend spent at the lake a couple of hours away from us and it's proving difficult to get back into the groove. It seems like any interruption to the creative process stalls my engine and takes forever to get started back up, lol!
So I'll share one of the cards I sent off to CHA with Impression Obsession. This cutie is called 'Little Witch'.

I wanted to color the entire background and knew doing it with Copics would take forever AND not look the way I wanted it, so I chose to airbrush it. I'm not 100% in love with the Copic ABS system, when I can get it to work the way I want it to. I used some liquid art masking fluid to paint over the stamped image to keep it white and when it dried I airbrushed the BG with a dark blue Copic. The masking fluid rubs right off with an eraser and I can color the main image as usual. I like using masking fluid for detailed images instead of tape or Post its, a lot easier to paint over it with a small paint brush than trying to cut all that detail out with scissors! I wish I'd found this stuff a long time ago....


Anyway, tomorrow it the LOTV challenge, be sure to stop by and check it out!


Thanks for looking!


Stamps: Impression Obsession Little Witch and Gliding By
Ink: Distress
Paper: PTI, Hammermill, Graphic 45, Core'dinations
Tools & Accessories: Cuttlebug EF, striped ribbon, Spellbinders Labels, Copics, Copic ABS system, Stickles

Thursday, August 4, 2011

Impression Obsession Orange Challenge

Hello everyone, it's time for our IO Thursday challenge, and our theme is ORANGE. This one kind of scared me, because me and Orange do not get along real well. But then I got to thinking that Halloween is all about Orange, and I love Halloween! Clear as mud right? I don't get it either. I hate orange unless it's for Halloween, lol.
Well once I had my plan for a Halloween card, it was simple to pick a stamp. I've been itching to color this little baby up. It's called 'Trick or Treat' and it's by the new artist Claudia Pearl. Have you seen all the new stamps by this wonderful artist?! They are adorable! 


I water colored the image with Distress inks and a water brush. I went back after it was all dry and deepened some of the shading with a chisel blender using a dry brushing technique. 


The patterned paper was stamped with a couple of Cover-a-card stamps; Gingham and Distressed Corduroy. I wanted some speckles all over it too, so I got my old toothbrush that I use specifically for this technique, watered down some black and white acrylic paints and spattered some on the paper. Love that effect.


We'd love to have you join in on the challenge with us, head on over to the IO blog for all the details on how you can win some IO bucks!


Here's the rest of the DT ladies that are joining in on the challenge too:


Thanks for stopping by!

Stamps: Impression Obsession Sweetest Pumpkin, CAC Gingham & Distressed Corduroy, Trick or Treat
Ink: Versafine, Distress
Paper: Fabriano w/c paper, PTI, SU, Heavenly White 
Tools & Accessories: PDC spider web cut w/ Gazelle, Glimmer Mist, Spica pens, polka dot ribbon, Americana acrylic paint, old toothbrush

Wednesday, August 3, 2011

Lili of the Valley Roses Challenge

Hello blog buddies, I'm ready for the LOTV Thursday Challenge! Our theme this week is to use roses in some way on our projects. Not hard to do, I love this rolled rose die from MFT and use it when ever I can! I created a pretty pink one from my hand dyed wool felt. Delicious stuff to work with - that real wool! 

I chose 'Oh Christmas Tree' for my nontraditional colored Christmas card, colored with Copics. While browsing new-to-me digital scrapbook sites last weekend I came across Raspberry Road Designs and ended up purchasing quite a few digital paper packs. I fell in love with this Victorian Holiday set, the colors are beautiful!


I matted the image on two gold die cut frames from Marianne Designs Creatables. Love those elegant scrolls. The rose was attached to some sparkly snowflakes and a couple of pine branch punch outs. A pretty blue-green bow and voila! 


Now if you need more rosy inspiration head on over to the LOTV blog and check out what the rest of the team came up with. Then you can create your own card and enter it for a chance to win some much needed LOTV cash!


Thanks for visiting!

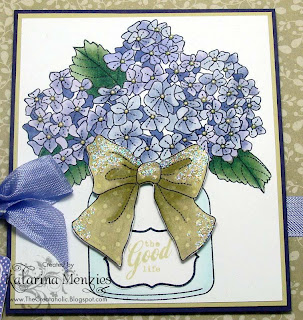
Happy Hydrangeas

Good morning! Boy was I happy when I saw my most favorite flower released in a new stamp set by Papertrey Ink. I LOVELOVELOVE Hydrangeas. I had a beautiful one on my back deck a couple of years ago that was just stunning, all different shades of pale blue to Periwinkle to Blue-Violet and pale Lime green centers. Breathtaking! It's gone now. I didn't research how to overwinter potted Hydrangeas here in chilly PA and the poor things froze to death, boo hoo!


One of my stamping related goals is to some day be able to replicate my beautiful departed Hydrangea on paper, I want to capture the colors in Copics or colored pencils, or water color. It has not happened on this card. 

I like this one though, it's pretty enough. I still need to practice though, and one day I'll get it right.


Thanks for stopping by, tomorrow is challenge day, see you then!


Most supplies are from Papertrey ink except for seam binding. 

Tuesday, August 2, 2011

Wish Big Angel

Good morning everyone, getting back into the swing of things now! I have a sweet little angel card to show you today using one of Wee Stamps' digital designs. I used very light Copics to color the whole thing, I wanted a soft, ethereal look.


The paper are from the Basic Grey Wisteria pad. I made the felt roses using MFT's rolled rose die. I love the roses that die makes...


My new Ottlite is not serving me as well as my old one, and I don't know why. They use the same bulb but this one doesn't seem to be as bright. I'm kind of disappointed and might have to invest in yet another one. Maybe a larger floor lamp version. My pictures just don't seem as vibrant and if I touch them up too much with photo editing, they look too far apart from the original. Sigh...


You'll have to take my word for it that this card looks much more beautiful in person than the picture.


Thanks for visiting again, have a wonderful day!


Stamps: Wee Stamps Digital image, PTI sentiment
Ink: Memento
Paper: PTI, Basic Grey, shimmer cardstock from The Paper Temptress
Tools & Accessories: Martha Stewart Vintage Doily punch, Nestabilities, Copics, Viva Decor Pearl Pen, hand dyed wool felt, MFT Die, PTI buttons, organza ribbon, Bow Easy, PTI Tiny Tags die